




Digital Signature Client
The LogicalDOC Digital Signature Client is a Windows desktop application that allows users to digitally sign PDF documents and upload the signed documents to LogicalDOC.
The client supports certificates installed on the local computer and digital signature devices such as smart cards and USB tokens through PKCS#11 middleware.
The signature can be invisible or displayed on the PDF as a visible signature. Its position, size and graphical appearance can be configured, and an optional document preview allows the user to verify or interactively position the signature before signing.
The Digital Signature Client for your Windows PC is available on the LogicalDOC download website .
Server configuration
Before using the Digital Signature Client, configure the connection to your LogicalDOC server.
Open the client and select File > Configuration.
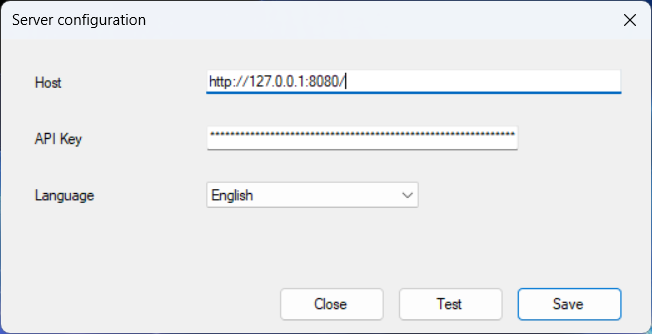
| Setting | Description |
|---|---|
| Host | URL of the LogicalDOC server, for example https://your-server:port/. |
| API Key | API key used by the Digital Signature Client to authenticate with LogicalDOC. |
| Language | Language of the signed documents uploaded to LogicalDOC. The server stores this information as document metadata and uses it to select the appropriate language-specific indexer for full-text indexing and search. |
Note: The Language setting does not change the user interface language of the Digital Signature Client. It defines the language metadata assigned to the documents uploaded by the client.
Click Test to verify the connection to LogicalDOC. When the connection has been successfully tested, click Save to store the configuration.
Creating an API Key
It is recommended to create a dedicated API Key for the Digital Signature Client instead of reusing an API key assigned to another application.
Sign in to LogicalDOC and open Account > Security > API Keys. Create a new API key and give it a meaningful name, such as Digital Signature Client.
Copy the generated key and paste it into the API Key field of the client.
Important: Keep the API key private. The complete key is displayed when it is created. If the key is lost, generate a new one.
For detailed instructions about generating an API key, see API Keys. The API key generation procedure described there also applies to the Digital Signature Client.
Signature configuration
Open Signature Configuration to configure the behavior and appearance of digital signatures.
The configuration dialog contains three tabs: Signature, Appearance, and PKCS#11.
Signature
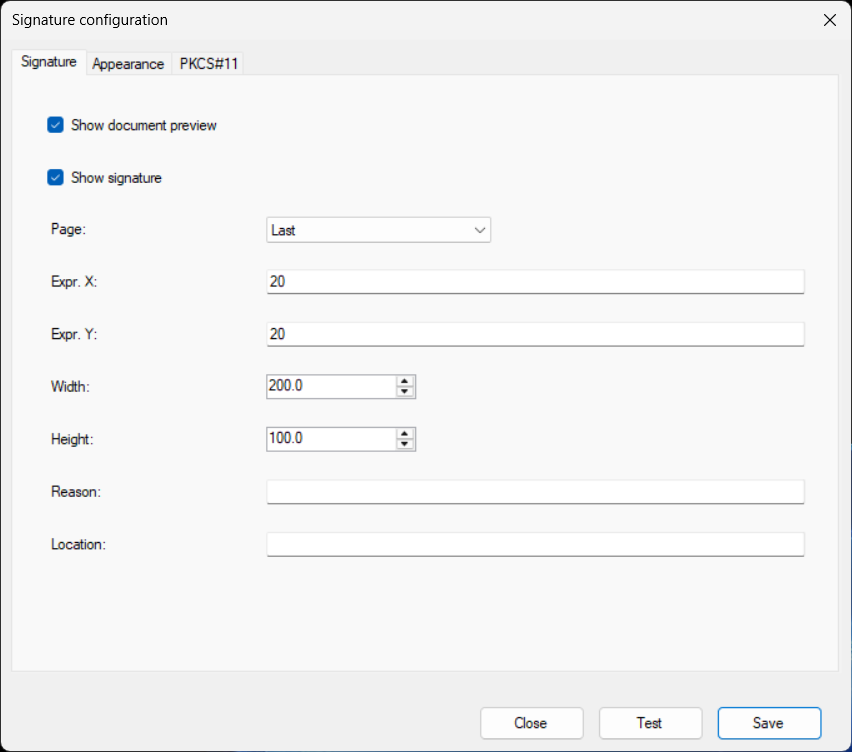
The Signature tab controls the visible signature and its placement in the PDF.
Show document preview
Enable Show document preview to display the PDF before signing.
The preview allows you to inspect the document and verify the position and appearance of the visible signature before the digital signature is applied.
The preview is also required when using the Dynamic page mode.
Show signature
Enable Show signature to add a visible representation of the digital signature to the PDF.
If this option is disabled, the document can still be digitally signed, but no visible signature area is displayed on its pages.
Page
The Page setting determines where the visible signature is placed.
- First – places the visible signature on the first page.
- Last – places the visible signature on the last page.
- All pages – displays the signature appearance on every page of the PDF.
- Dynamic – allows the user to choose the page and move the visible signature interactively in the document preview.
Note: All pages does not create a separate cryptographic signature for every page. The client creates one digital signature and places its visible appearance into the content of every page. The graphical appearances are therefore covered by the same digital signature.
When Dynamic mode is used, the signature rectangle can be dragged with the mouse to the required position.
Position expressions
For non-dynamic positioning, the Expr. X and Expr. Y fields determine the position of the visible signature.
PDF coordinates use the bottom-left corner of the page as their origin. Increasing X moves the signature towards the right, while increasing Y moves it upwards.
The expression evaluator supports numeric values, parentheses and the arithmetic operators +, -, * and /. Unary + and - are also supported.
| Macro | Description |
|---|---|
PAGE_WIDTH |
Width of the current PDF page |
PAGE_HEIGHT |
Height of the current PDF page |
PAGE_CENTER |
Horizontal center of the current page |
PAGE_MIDDLE |
Vertical middle of the current page |
SIGN_WIDTH |
Width of the visible signature |
SIGN_HEIGHT |
Height of the visible signature |
The macros are evaluated using the dimensions of the current page and the configured signature. Macro names are case-insensitive.
Positioning examples
| Position | Expr. X | Expr. Y |
|---|---|---|
| Bottom-left | 20 |
20 |
| Bottom-right | PAGE_WIDTH - SIGN_WIDTH - 20 |
20 |
| Top-left | 20 |
PAGE_HEIGHT - SIGN_HEIGHT - 20 |
| Top-right | PAGE_WIDTH - SIGN_WIDTH - 20 |
PAGE_HEIGHT - SIGN_HEIGHT - 20 |
| Bottom-center | PAGE_CENTER - SIGN_WIDTH / 2 |
20 |
| Page center | PAGE_CENTER - SIGN_WIDTH / 2 |
PAGE_MIDDLE - SIGN_HEIGHT / 2 |
In these examples, 20 represents the desired margin from the corresponding page edge.
The calculated coordinates are automatically constrained to the page boundaries, preventing the configured signature rectangle from being positioned outside the page.
Decimal values can use either a period or a comma as the decimal separator.
Width and Height
Width and Height define the dimensions of the visible signature area.
These dimensions are also available to position expressions through the SIGN_WIDTH and SIGN_HEIGHT macros.
Reason
The optional Reason field specifies the reason associated with the digital signature.
Location
The optional Location field specifies the location associated with the signing operation.
Signature appearance
Select the Appearance tab to customize the graphical appearance of the visible signature.
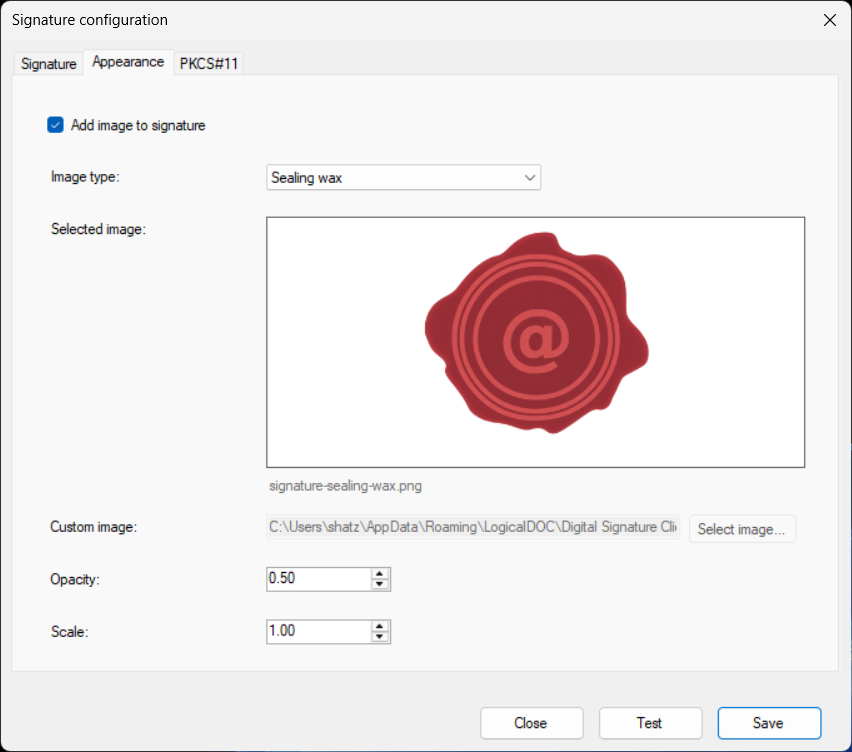
Add image to signature
Enable Add image to signature to include an image in the visible signature.
The image is rendered as part of the signature appearance together with the signature information.
Image type
Three image types are available:
- Logo
- Sealing wax
- Custom image
Selecting one of the predefined images displays it in the Selected image preview.
Custom image
Select Custom image to use your own graphical element.
Click Select image... and choose an image from the local computer.
The supported formats are JPG, JPEG, PNG, BMP and GIF.
Opacity
Opacity controls the transparency of the image.
Reducing the opacity creates a watermark-like effect and helps keep the signature information readable above the graphical element.
Scale
Scale controls the size of the image within the visible signature area.
The graphical image is drawn in the background, while the signature information is rendered above it.
PKCS#11 configuration
The PKCS#11 tab configures access to digital signature devices such as smart cards and USB tokens.
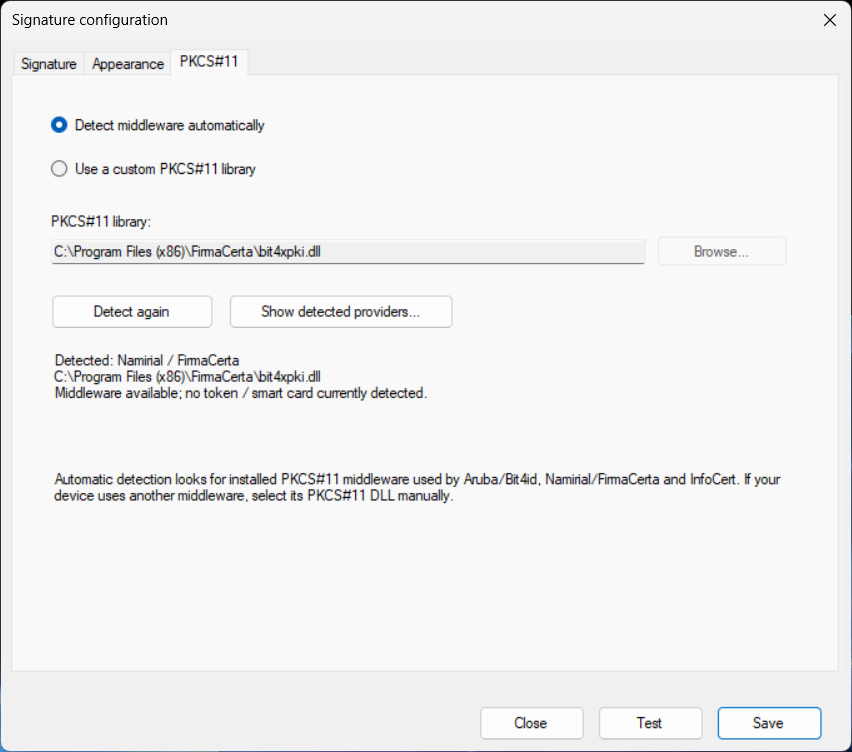
Detect middleware automatically
Select Detect middleware automatically to let the Digital Signature Client search for compatible PKCS#11 middleware installed on the computer.
Automatic detection looks for middleware commonly used by Aruba/Bit4id, Namirial/FirmaCerta and InfoCert.
When compatible middleware is found, the client displays the detected provider, PKCS#11 library path and current device status.
The status indicates whether the middleware can be loaded and whether a token or smart card is currently available.
Detect again
Click Detect again to repeat automatic middleware detection.
This can be useful after installing middleware or connecting a new smart card or USB token.
Show detected providers
Click Show detected providers... to display the PKCS#11 providers detected on the computer.
This diagnostic function is particularly useful when multiple signature applications or middleware packages are installed. The dialog identifies usable providers and whether they currently expose an available token.
Use a custom PKCS#11 library
If your device uses middleware that cannot be detected automatically, select Use a custom PKCS#11 library.
Click Browse... and select the PKCS#11 DLL supplied by your signature-device or middleware provider.
The client verifies that the selected library exists and can be loaded before accepting the configuration.
Testing the configuration
Click Test to test the selected PKCS#11 middleware.
The client reports whether the library can be loaded and whether a token or smart card is currently available.
Signing documents
Documents submitted for signing are processed by the Digital Signature Client.
Depending on the configured signature method, the client asks the user to select the certificate or signing device required to complete the operation.
Select the destination
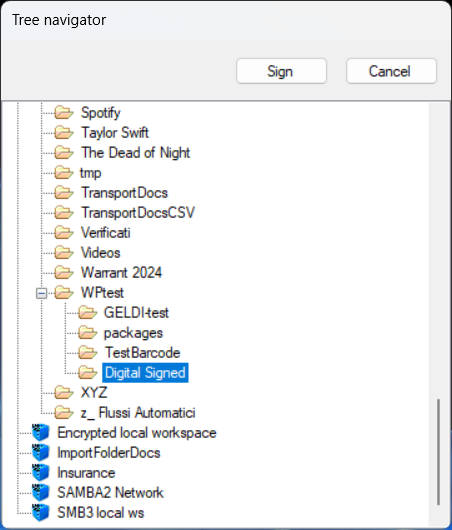
The Tree navigator displays the LogicalDOC folder structure.
Select the LogicalDOC folder where the signed documents have to be stored and click Sign to continue.
Click Cancel to abort the operation.
Select the digital signature
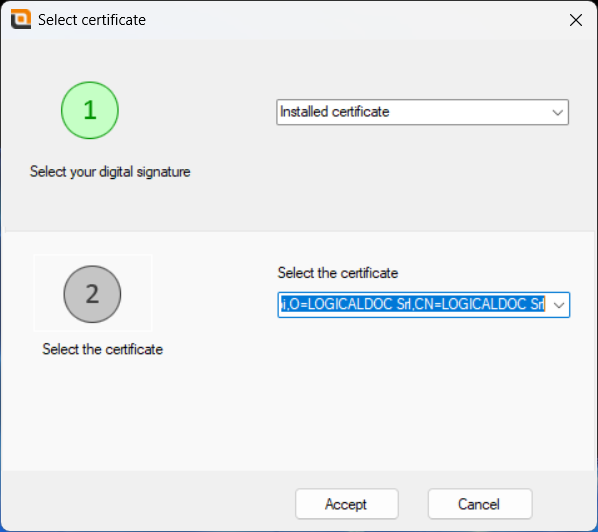
The Select certificate dialog allows you to select the digital signature method and the certificate that will be used.
When Installed certificate is selected, choose an appropriate certificate available on the computer and click Accept.
When a smart card or USB token is used, the Digital Signature Client communicates with the device through the configured PKCS#11 middleware. If authentication is required by the device, the corresponding PIN is requested before signing.
Signature preview
When Show document preview is enabled, the PDF is displayed before signing.
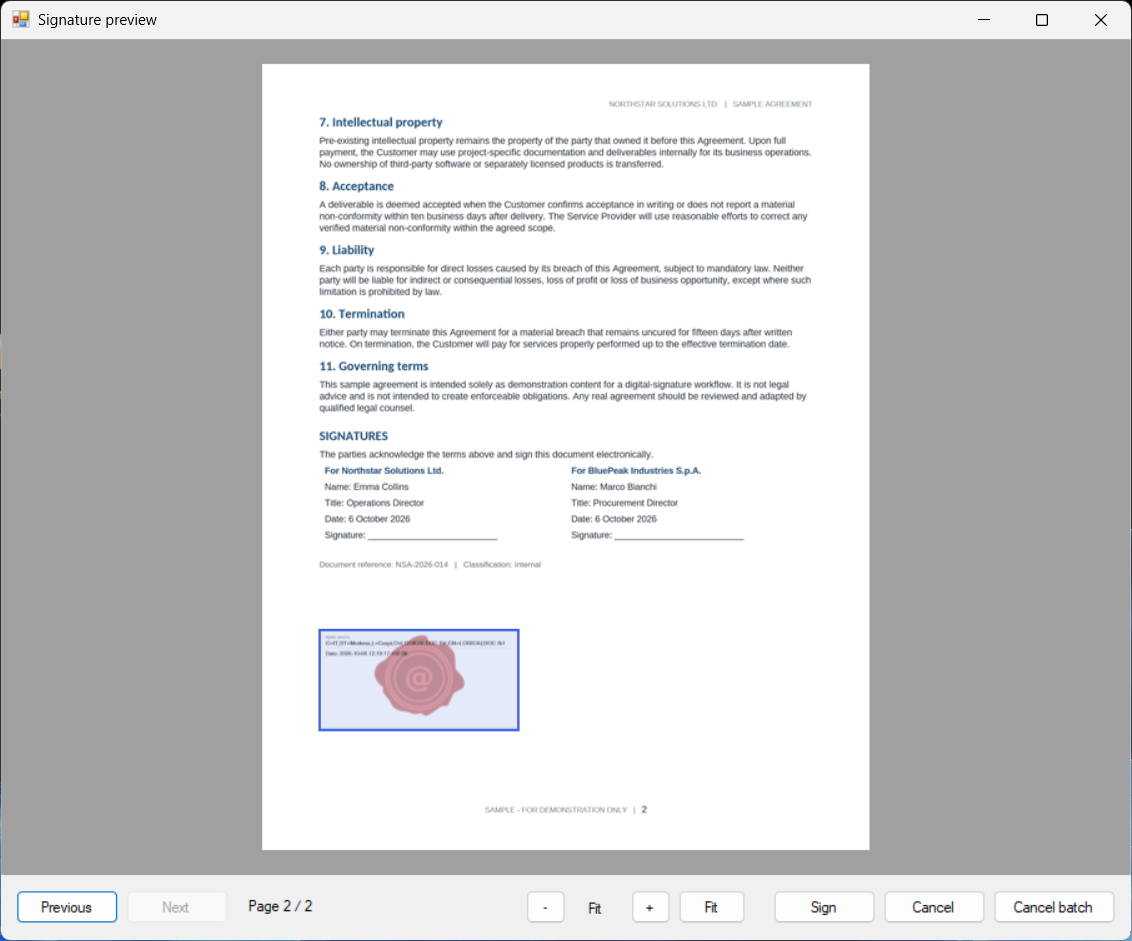
The preview shows the actual PDF page and the visible signature appearance.
When page navigation is available, use Previous and Next to browse the document. Page navigation is enabled for Dynamic and All pages modes.
Use - and + to change the zoom level. Click Fit to automatically fit the current PDF page into the preview window.
In Dynamic mode, drag the signature area with the mouse to position it anywhere within the page boundaries.
Click Sign to confirm the preview and sign the current document.
Click Cancel to skip the current document and continue processing the remaining documents in the batch.
Click Cancel batch to stop the entire batch.
Closing the preview window with the window close button or pressing Esc also skips only the current document; it does not cancel the complete batch.
Processing queue
The main Digital Signature Client window displays the result of document processing.
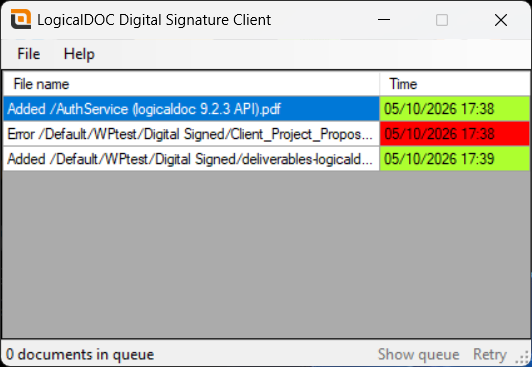
Successfully processed documents are reported as Added, while documents that could not be processed are displayed as Error.
The bottom area of the application shows the number of documents currently remaining in the processing queue.
Show queue
Click Show queue to inspect documents that are still waiting to be processed.
This is useful when processing has been interrupted and some documents remain pending.
Retry
If processing is interrupted by a temporary problem, the unprocessed documents can remain in the queue.
After resolving the problem, click Retry to attempt processing the remaining documents again.
This makes it possible to resume an interrupted batch without manually adding the pending documents again.
Verifying the signature in LogicalDOC
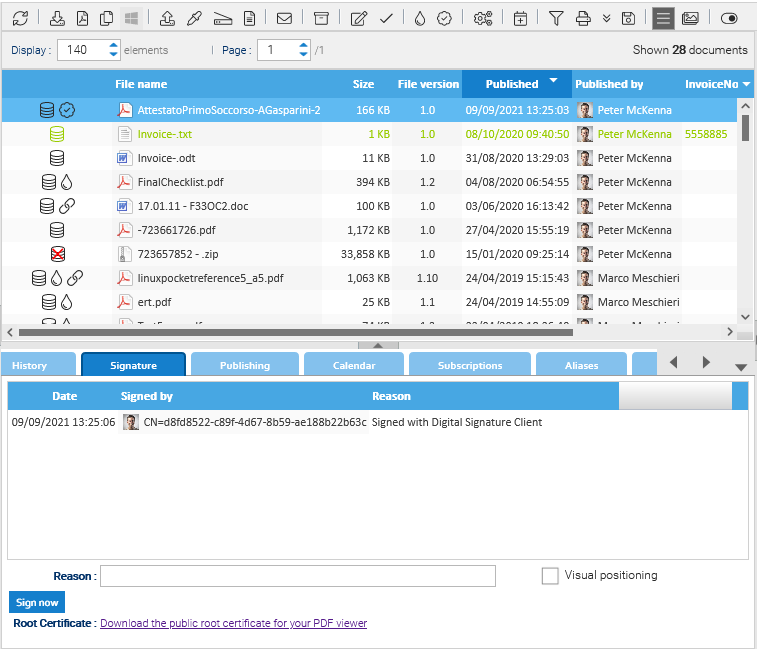
After the signed document has been uploaded, you can verify the digital signature directly from the LogicalDOC web interface.
Signed documents are identified by a signature icon displayed next to the document in the documents grid.
Select the document and open the Signature panel to view the signature information recorded by LogicalDOC, including the signing date, certificate information and the reason associated with the signature.
Error handling
The Digital Signature Client is designed so that an error affecting an individual document does not necessarily stop the complete batch.
For example, if a PDF is protected by an open password, the client reports that the document cannot be opened, skips that document and continues processing the remaining documents.
Similarly, when the preview cannot open a PDF, the error is reported for that document and processing continues with the next one.
Documents that remain unprocessed following an interruption can subsequently be processed using the queue and Retry functions.
Troubleshooting
The client cannot connect to LogicalDOC
Open the server configuration and verify the Host and API Key.
Use Test to verify the connection.
Make sure that the API key belongs to the intended LogicalDOC user and has been copied correctly.
No smart card or USB token is detected
Open Signature Configuration > PKCS#11 and verify the detected middleware.
Make sure that the device is connected and click Detect again.
A middleware library can be successfully detected even when no smart card or token is currently connected; the status displayed by the client distinguishes between these two conditions.
The middleware is installed but is not detected automatically
Click Show detected providers... to inspect the available providers.
If the required provider is not available through automatic detection, select Use a custom PKCS#11 library and manually select the DLL supplied by the middleware provider.
A PDF cannot be signed because it is password protected
A PDF protected with an open password cannot be opened for signing. The client reports the affected document, skips it and continues processing the batch.
The visible signature is in the wrong position
Check Expr. X, Expr. Y, Width and Height.
Remember that PDF coordinates start from the bottom-left corner.
For example, to position a signature 20 units from the bottom-left corner:
Expr. X: 20
Expr. Y: 20
To position it 20 units from the bottom-right corner:
Expr. X: PAGE_WIDTH - SIGN_WIDTH - 20
Expr. Y: 20
Alternatively, select Dynamic and position the signature interactively in the document preview.