
Connect Google Gmail emailbox

LogicalDOC can connect to Gmail in two ways:  using a Google App Password or using OAuth 2.0 authentication. OAuth is the recommended, more secure method, but it requires additional setup in Google Cloud. For a simpler configuration, you can use an App Password, which is available if your Google account has 2-Step Verification enabled.

Connecting LogicalDOC to Gmail Using an App Password

To generate your App Password you can follow the instructions on this page

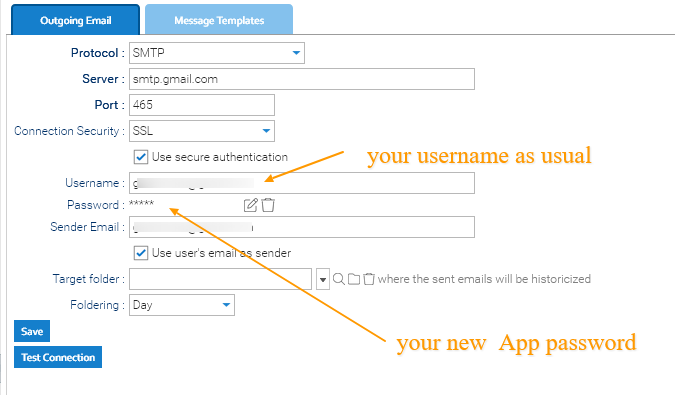
Once generated, Insert the App Password in LogicalDOC by simply going to > Administration > Import and Export > Email Accounts

  1. Create the new email account to monitor
  2. In the Protocol field put: IMAP or POP3
  3. Enable the SSL
  4. In the Server field, put: imap.gmail.com
  5. In the Port field put: 993
  6. In the Username field, put the same mailbox
  7. In the Password field, put the created App Password

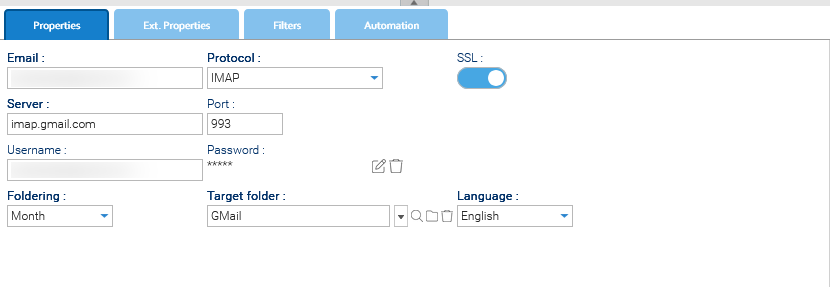
Save and test the mailbox connection.

Connecting LogicalDOC to Gmail Using OAuth

OAuth provides a more secure and modern authentication method for connecting LogicalDOC to Gmail without storing your password. To set it up, you can follow the instruction on this page

  1. Create the new email account to monitor in Administration > Import and Export > Email Accounts
  2. In the Protocol field put: IMAP Google or POP3 Google
  3. Enable the SSL
  4. In the Server field, put: imap.gmail.com
  5. In the Port field put: 993
  6. In the Username field, put the same mailbox
  7. In the Password field, the mailbox password


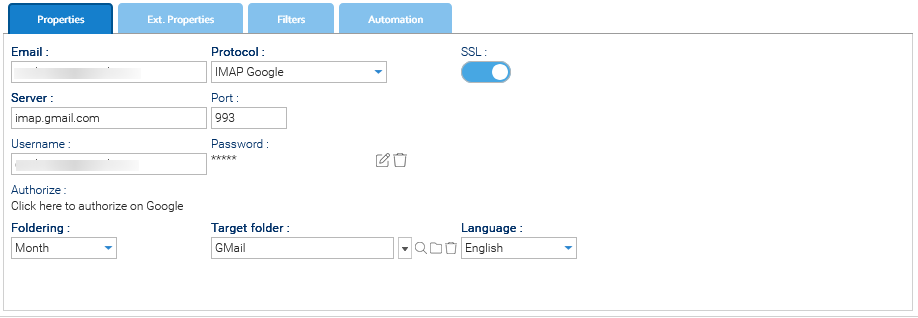
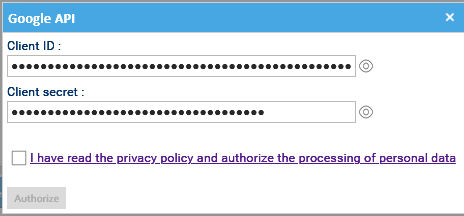
  8. Once everything is set up, you have to click on the Authorize link to insert the Client ID and Client Secret

Connect Google Gmail Mail Server

LogicalDOC can connect to Gmail in two ways:  using a Google App Password or using OAuth 2.0 authentication. OAuth is the recommended, more secure method, but it requires additional setup in Google Cloud. For a simpler configuration, you can use an App Password, which is available if your Google account has 2-Step Verification enabled.

Connecting LogicalDOC to Gmail Using an App Password

To generate your App Password, you can follow the instructions on this page

Once generated, Insert the App Password in LogicalDOC by simply going to Administration > Settings > Outgoing Email

  1. In the Protocol field, put: SMTP
  2. In the Server field, put: smtp.gmail.com
  3. In the Port field put: 465
  4. In the Username field, put the same mailbox
  5. In the Password field, put the created App Password

Finally, test the successful integration by clicking on the Test Connection button 

Connecting LogicalDOC to Gmail Using OAuth

OAuth provides a more secure and modern authentication method for connecting LogicalDOC to Gmail without storing your password. To set it up, you can follow the instruction on this page

Snippets

link to a menu


Warning

Body


Info

Body

Info

Body

download 


Include Drop Table:

AUTOMATION CONTEXT: VALIDATION
VariableJava ClassDescription
objectExtensibleObjectthe object under validation, for instance a Document or a Folder
eventHistorythe current event
errorsmap of strings. Key is the attribute name, Value is the error description
attributeNamename of the current attribute being validated (only available in attribute validator)
attributeAttributethe current attribute being validated (only available in attribute validator)
valuevalue of the current attribute being validated (only available in attribute validator)
errorValidationErrorkeeps the error description of the current attribute being validated (only available in attribute validator)


Put an automation dictionary:

Dictionary available for the Automation in this context

AUTOMATION CONTEXT: EMAIL IMPORT
VariableJava ClassDescription
email

EMail

the email being imported
account

EmailAccount

the account from which the email is being imported
messagethe message representation as returned by the mail server
document

Document

the document that will be used to save the email in the repository
documents

Document

list of documents that will be used to save the email and it's attachments in the repository
importsPair<EMail, List<Document>>

list of imported messages (Pair email - list of imported documents) during the crawling of the current email account

errors

Pair<String, Exception>

list of errors (Pair error nessage - exception) happened during the crawling of the current email account

Read the Automation manual for more information.


Include a video from YouTube:


Put an image as lightbox:

TITLE XXXX
 

TITLE XXXX


Pre-formatted text:

$ sudo apt-get install ghostscript
$ sudo apt-get install imagemagick
$ whereis convert
$ convert –version
 
Minimum Hardware Requirements
Server 2.4 GHz 32-bit (x86) or 64-bit (x64) dual core processor
6 GB of system memory
1 GB of storage for the application data and repository storage as needed.
Workstations 2.0 GHz 32-bit (x86) or 64-bit (x64) processor
1 GB of system memory
50 MB storage space
Broadband connection to server
Minimum Software Requirements
LogicalDOC Server Installer Package Red Hat Enterprise Linux 7 (32-bit and 64-bit)
SUSE Linux Enterprise Server 10 (32-bit and 64-bit)
CentOS Linux 6 (32-bit and 64-bit)
Ubuntu 14 (32-bit and 64-bit)
Microsoft Windows 2008 Server (32-bit and 64-bit)
Microsoft Windows 7 (32-bit and 64-bit)
MAC OS X Lion (OS X 10.8)
Java JDK 8
Supported Browsers Firefox 40
Internet Explorer 11
Edge 25
Google Chrome 40
Safari 6
 

Clear Browser Cache

Each time your installation is upgraded, you have to clear the Web browser cache in order to force the browser to load the latest version of the Graphical User Interface.

Internet Explorer
  1. Click Tools from the Internet Explorer menubar
  2. Click Internet Options
  3. Click the General tab
  4. Check Temporary Internet files item
  5. Click on Delete.
Firefox
  1. At the top of the Firefox window, click on the Firefox button and then click Options
  2. Select the Advanced panel.
  3. Click on the Network tab.
  4. In the Cached Web Content section, click Clear Now.
  5. Click OK to close the Options window
Chrome
  1. Click the wrench icon on browser tool bar
  2. Select Tools
  3. Select Clear browsing data
  4. In the dialog that appears, select the checkboxes for the types of information that you want to remove
  5. Use the menu at the top to select the amount of data that you want to delete. Select beginning of time to delete everything.
  6. Click Clear browsing data
Safari
  1. In the Safari menu bar, click the Safari option
  2. Select the Preferences link
  3. In the Preferences window, click the Advanced tab
  4. At the bottom of the window, select the Show Develop menu in menu bar checkbox
  5. Return to the Safari menu bar and click the Develop option
  6. Select the Empty Caches link
Opera
  1. Click Edit from the Opera menu bar
  2. Click Preferences from the File menu
  3. Click the History and Cache menu
  4. Click Cache
  5. Click ok to close the Preferences menu

Restoring a document

From the documents list in the trash panel, select the document you want to restore and then use the [Restore] item of the context menu.

After that the document will be restored and it will appear in the current folder, if you have the write permission.

More Articles …