Install third-party Software on Windows

To have additional features like the full preview, you need to install some external components.

Ghostscript

LogicalDOC uses Ghostscript to render the documents' thumbnails. Ghostscript is available at the following URL: https://ghostscript.com/

At the time of writing LogicalDOC has been tested against Ghostscript 9.53.3 64bit, so we suggest going with it.

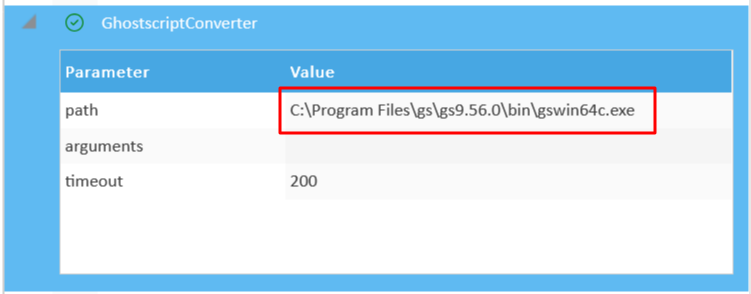
After having installed LogicalDOC, remember to enter in Administration > Import and Export > Format Converters, select the GhostscriptConverter and here specify the correct path of the gswin64.exe command(it should be C:\Program Files\gs\gs9.56.0\bin\gswin64.exe ):


Install the Application on Windows

Get from the download site the installer file: installer-win-<ver>.exe

To install LogicalDOC just double-click on the downloaded installer and follow the setup steps. Leave all settings as default or change them at your will. The installer will guide you in connecting LogicalDOC to an existing database(MySQL, Oracle or SQL Server), don't use the embedded database for production. At the end of installation, point the browser to http://localhost:8080/ and enter with:

Username: admin
Passowrd: admin

Check the paths of external tools

After the installation it is better to check that all needed external apps are correctly configured.

Enter the administration: Administration > Import and Export > Format Converters > GhostscriptConverter

Here, check if the specified path is correct.

NOTE: paths may be different in your system

Save

Save

Install with Docker

Docker is a tool designed to make it easier to create, deploy, and run applications by using containers. Containers allow us to package up our application with all the parts it needs, such as libraries and other dependencies, and ship it all out as one package. By doing so, thanks to the container, LogicalDOC will run on any other machine regardless of any customized settings that machine might have.

Install Docker

Download and install Docker for your system: https://hub.docker.com/r/logicaldoc/logicaldoc

UserNo

When you run the image the first time, you have to pass your license's UserNo as parameter of the command: --env LDOC_USERNO=<your userno>

UserNo is a license activation code for LogicalDOC. If you do not have one, you can get a 30-day license key to try the software at the following address https://www.logicaldoc.com/try

Installation and first run of LogicalDOC

With Docker properly installed, proceed launching a MariaDB container and then the LogicalDOC container:

$ docker run -d --name=logicaldoc-db -p 3306:3306 --env="MARIADB_ROOT_PASSWORD=mypassword" --env="MARIADB_DATABASE=logicaldoc" --env="MARIADB_USER=ldoc" --env="MARIADB_PASSWORD=changeme" mariadb:11.8
$ docker run -d --name=logicaldoc -p 8080:8080 -p 8022:22 --env LDOC_USERNO=<your_userno> --env DB_ENGINE=mariadb --env DB_HOST=logicaldoc-db --link logicaldoc-db logicaldoc

This command installs the Docker image and will put it in execution, creating a Container named logicaldoc. LogicalDOC is now accessible at http://localhost:8080 and default User and Password are admin / admin.

Start and Stop the LogicalDOC container

The run command has created a persistent container in your host server, you should execute docker run just one time. Each time you execute the docker run, a new empty container will be created. Normally you stop and start several times the same LogicalDOC container initially created with the run.

To stop the currently running LogicalDOC Container, type this command:

$ docker stop logicaldoc

To start again the LogicalDOC Container, type this command:

$ docker start logicaldoc

The data created during the execution are maintained persistent inside the Container

LogicalDOC on Docker Hub

To know about all the options available for the LogicalDOC Docker Images, visit our Docker Hub profile:

Install on Windows

To install on Windows, please follow these three steps:

  1. Prepare de Database
  2. Install third-party Software
  3. Install the LogicalDOC application

Attention

This guide assumes you are performing the installation by using the Administrator user

Notice for use of OpenJDK

If you opt for using an open source OpenJDK instead of the official Oracle JDK, please download the installer here: https://adoptium.net/temurin/
Choose the latest LTS release and download the .msi file.

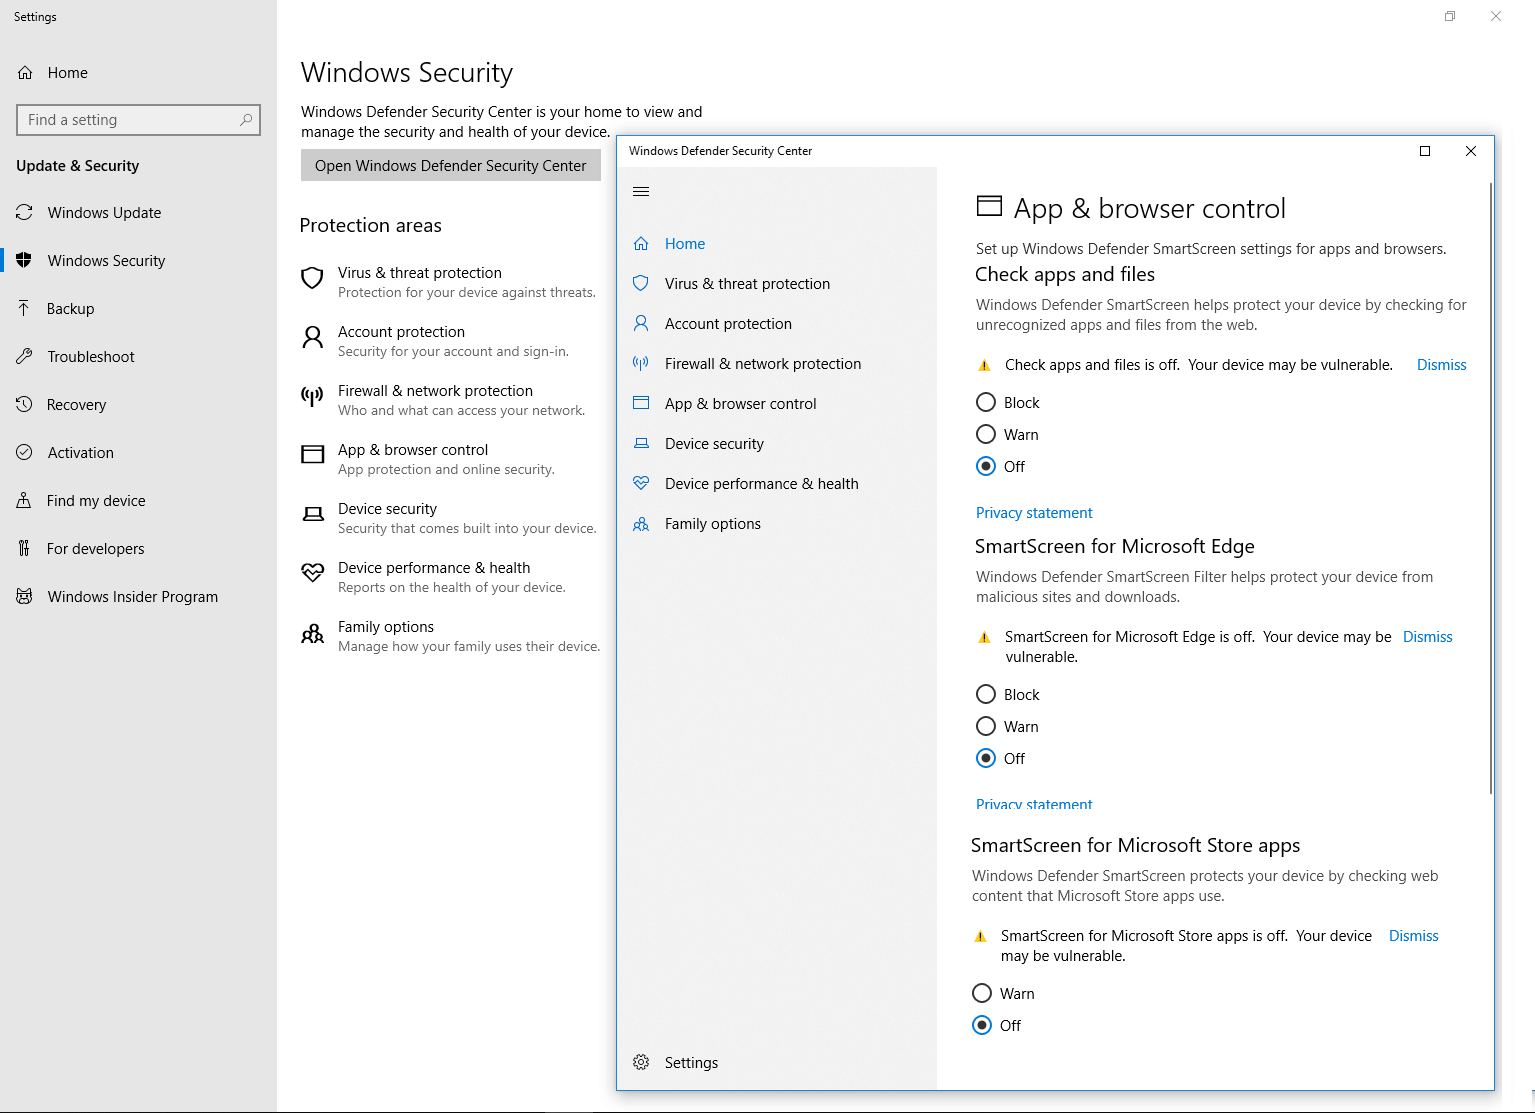
By default, Windows will not allow you to install a .msi file, so you should temporarily disable the SmartScreen.
To do so, open the Windows Defender Security Center go to Windows Security > Apps & browser control

LogicalDOC Data Source

Here, turn off all the blocks (you could activate them again after the installation), and then install the .msi.


Prepare the Database on Windows

The LogicalDOC's installer also includes a MariaDB and will use it by default, but if you want to connect LogicalDOC to an existing MySQL or MariaDB installation, this guide describes how to prepare the database where the application will store all data. The MySQL (currently we recommend MySQL 8) package and its installation instructions for your system are available here: www.mysql.com

We also provide a video guide for the installation of MySQL - Watch the video on YouTube

Default settings

LogicalDOC requires you to configure your MySQL installation to best fit the needs of a professional DMS.

Supposing that your MySQL data folder is C:\ProgramData\MySQL\MySQL Server 8.0 open the configuration filemy.ini, find the [mysqld] section and put the following settings and make sure to have the following settings in the [mysql] and [mysqld] sections:

[mysql]
default-character-set = utf8

[mysqld]
character-set-server = utf8
collation-server = utf8_bin
default-storage-engine = INNODB

This sets the encoding to UTF-8 and the default storage engine to the INNODB with transactions support.

After the editing, restart the MySQL service.

Creating the database

Connect to mysql prompt by typing the command:

$ "C:\Program Files\MySQL\bin\mysql.exe" -u root -ppassword

Execute the following command at the mysql prompt:

CREATE DATABASE logicaldoc;

Now we have an empty database called logicaldoc with a user root that can access it using password password.
You can exit the mysql prompt (command \q) and go ahead.

http://dev.mysql.com/doc/refman/5.1/en/macosx-installation.html