Install third-party Software on Linux

To have additional features like the full preview, you need to install some external components.

LibreOffice

Please download and install LibreOffice in your system: https://www.libreoffice.org/download/

ImageMagick

You have to install and configure ImageMagick (rel 6.6 or greater). LogicalDOC uses ImageMagick to manipulate images for previewing. Verify if ImageMagick is already installed on your system. You can run the convert command, which is part of ImageMagick and usually located in /usr/bin. If ImageMagick is not present, browse to the ImageMagick download site and install the appropriate package for your platform.

On CentOS you can install ImageMagick by executing this command:

$ yum install imagemagick

GhostScript

LogicalDOC needs to print documents to a virtual device sometimes when performing barcode recognition. In general in GhostScript is a package installed by default in all Linux distributions.

To install it on CentOS, execute this command:

$ yum install ghostscript

Tesseract

Tesseract is an Open Source OCR engine adopted by Google. This package represents the basic OCR engine available on LogicalDOC and it is required only if you want to extract texts inside images.

Read this Mini How-To on how to install it.

OpenSSL

OpenSSL is the most known Open Source SSL implementation. This package is required to sign documents server-side.

To install it on CentOS, execute this command:

$ yum install openssl

Antivirus ClamAV

LogicalDOC is integrated with the antivirus ClamAV and can be used to inspect your files at upload time.

To install it on CentOS, execute this command:

$ yum install clamav


Prepare the Database on Linux

In order to setup a production system you have to prepare a MySQL database where the application will store all data.
To perform this step, make sure to have a MySQL up and running, so execute the command: /etc/init.d/mysql status

Default settings

LogicalDOC requires you to configure your MySQL installation to best fit the needs of a professional DMS.

Edit your current my.cnf configuration file, and make sure to have the following settings in the [mysql] and [mysqld] sections:

[mysql]
default-character-set = utf8

[mysqld]
character-set-server = utf8
collation-server = utf8_bin
default-storage-engine = INNODB

This sets the encoding to UTF-8 and the default storage engine to the INNODB with transactions support.

Setting Password for MySQL Root User

This step is just a suggestion in case you have a fresh MySQL install, it is not needed when you have an already configured database.

Execute the following commands at a shell prompt:

$ /usr/bin/mysqladmin -u root password 'password'

Creating logicaldoc Schema

Now we need to create a database schema for logicaldoc. So connect to mysql prompt typing the command:

$ /usr/bin/mysql -u root -ppassword

Execute the following commands at the mysql prompt:

CREATE DATABASE logicaldoc;

Creating logicaldoc User Account

CREATE USER logicaldoc;
SET PASSWORD FOR logicaldoc@'%'=PASSWORD('password');

Adding Grants
Execute the following commands at the mysql prompt:

GRANT ALL PRIVILEGES ON logicaldoc.* TO logicaldoc@'%' identified by 'password';

Now we have an empty database called 'logicaldoc' with a user 'logicaldoc' that can access it using password 'password'.
You can exit the mysql prompt(command \q) and go ahead.

Install the Application on Linux

Get from the download website the setup file: installer-linux-<ver>.zip

To install LogicalDOC unpack the zip archive, open a terminal window and execute the command from command line:

$ java -jar logicaldoc-installer.jar

If the system does not have a graphical interface, it is possible to launch the installation from the command console

$ java -jar logicaldoc-installer.jar -console

When the installer asks for database, please put your connection parameters as specified earlier during database preparation, don't use the embedded database for production.

Post-installation

To configure the execution of LogicalDOC at server bootstrap you need to do some manual taks that depend on the daemon system of your Linux.

System D

Copy the startup script into your system initialization directory so execute the command:

$ cp /LogicalDOC/bin/logicaldoc-all.service /usr/lib/systemd/system

Then enable and start the service:

$ systemctl enable logicaldoc-all
$ systemctl restart logicaldoc-all

System V

Copy the startup script into your system initialization directory so execute the command:

$ cp /LogicalDOC/bin/logicaldoc-all /etc/init.d

Then edit the file /etc/init.d/logicaldoc-all adjusting the paths. Save the file and execute the commands:

$ chkconfig --add logicaldoc-all
$ /etc/init.d/logicaldoc-all start

Now you can access the program using the browser, pointing it to http://localhost:8080/. Use the account admin with password admin to enter the first time.

Check the paths of external tools

After the installation it is better to check that all needed external apps are correctly configured.

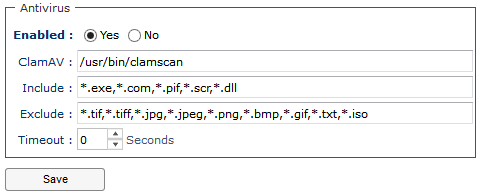
Enter the administration: Administration > Settings > Antivirus

Here, check if the path specified in ClamAV is correct.

Enter the administration: Administration > Settings > OCR

Here, check if the path specified in path is correct.

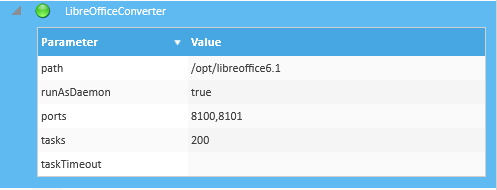
Enter the administration: Administration > Import & Export > Format Converters > LibreOfficeConverter

Here, check if the path specified in path is correct.

Enter the administration: Administration > Import & Export > Format Converters > ImageConverter

Here, check if the path specified in path is correct.

Enter the administration: Administration > Import & Export > Format Converters > GhostscriptConverter

Here, check if the path specified in path is correct.

NOTE: paths may be different in your system