GhostScript

LogicalDOC needs to print documents to a virtual device sometimes when performing barcode recognition.

In general in GhostScript is a package installed by default in all Linux distributions. On Ubuntu you can install in this way

$ sudo apt-get install ghostscript

Once you have GhostScript installed set the command.gs property(in file conf/context.properties) to the path of the gs executable:

command.gs=/usr/bin/gs

For Windows users

In Windows you don't have to do anything since the installer takes car of all installation and configuration issues.

System Requirements

Hardware requirements may vary based on the number of concurrent users, repository size and system configuration. Larger implementations may require some configuration tuning to perform optimally. LogicalDOC Commercial Subscribers may contact the LogicalDOC Support Team for further assistance. It is highly recommended that the hardware be dedicated to running the LogicalDOC Installation

LogicalDOC Cloud is the hosted version of LogicalDOC Enterprise and requires no server infrastructure. All you will need to connect to your LogicalDOC Cloud account is a modern Internet browser (see 'Supported Internet Browsers').

Minimum Hardware Requirements
Server

2.4 GHz 64-bit quad core processor

16 GB of system memory

4 GB of storage for the application data and repository storage as needed.

Workstations

2.0 GHz 64-bit dual core processor

8 GB of system memory

Broadband connection to server

Minimum Software Requirements

Server

Ubuntu Server 20

Red Hat Enterprise Linux 7

SUSE Linux Enterprise Server 10

Microsoft Windows Server 2012

Java 21

Workstations

Ubuntu 20

Red Hat Linux 7

SUSE Linux 10

Microsoft Windows 10

MAC OS X 10

Java 21

Supported Browsers

Firefox 70

Edge 25

Google Chrome 83

Safari 6


Installation

The application can be installed using the proper installer program downloadable from: https://dist.logicaldoc.com
Please, download the installer package available for your Operating System.

Verify the presence of Java JDK (Java Development Kit)

The Java JDK version 21 is a technological component required to execute both LogicalDOC installer and application, so you have to provide it before starting the installation procedure. You can check the presence of Java in your system by executing this command from a console:

$ java -version

If you don't have Java installed in your system, please download it from http://www.oracle.com/technetwork/java/javase/downloads/index.html.

In any case, visit http://www.oracle.com/technetwork/java/index.html for more information.

Notice for use of OpenJDK

If you opt for using OpenJDK instead of the official Oracle JDK, please download the installer here: https://adoptium.net/temurin/releases/?variant=openjdk21

Choose the release 21 (LTS).

Always download the LTS release

All the releases that are not declared LTS(Long Term Support) are only recommended for testing and not are considered stable for production

There is no support for non LTS releases.

Start the Installation

Once you have Java installed you are ready to start the installation of LogicalDOC in your server, please open the section of this guide dedicated to your Operative System.

Install from Command line

The Linux setup is: logicaldoc-cross-platform-installer-<ver>.jar
Download it and execute the following commands command from command line:

$ unzip logicaldoc-cross-platform-installer-<rel>.jar -d tmp
$ mkdir /LogicalDOC
$ tar -zxf tmp/LogicalDOCJex.tar.gz -C /LogicalDOC
$ chmod u+x /LogicalDOC/bin/*.sh
$ chmod u+x /LogicalDOC/tomcat/bin/*.sh
$ chmod u+x /LogicalDOC/ant/bin/*
$ cd /LogicalDOC/tomcat/webapps/
$ unzip root.zip -d ROOT

At this point you have a complete LogicalDOC distribution in the directory /LogicalDOC.

Now enter the directory /LogicalDOC/bin and /LogicalDOC/conf and where needed adjust the paths in shell scripts(.sh) and configuration files(.properties): find the placeholdes LDOCHOME and replace with the installation path. This activity is normally performed by the graphical setup, so in this case you have to do it by hand.

Start the execution using this command:

$ /LogicalDOC/bin/logicaldoc.sh start

After that, LogicalDOC is in execution and you have to perform the first setup, just point your browser to: http://localhost:8080/setup
If the browsers ask you the credentials, use admin / admin to access to the
Web Setup Procedure.


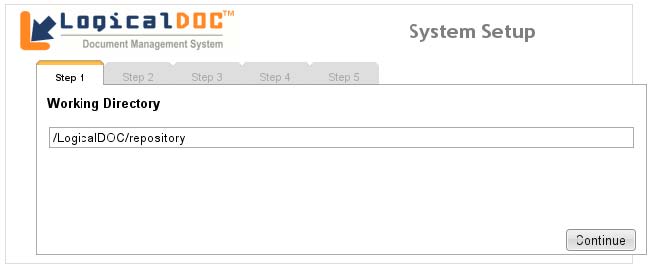
In the first step, select the repository folder as follows:
When you are asked to choose the database, select the External Database:
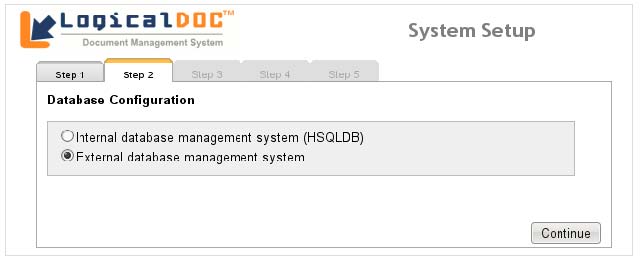

Than in the next panel, insert your connection parameters and in particular use logicaldoc as user and database schema and digit your password as specified earlier during database account creation.

Post-installation

To start LogicalDOC at server bootstrap you need to copy the startup script into your system initialization directory so execute the command:

$ cp /LogicalDOC/bin/logicaldoc /etc/init.d

Then edit the file /etc/init.d/logicaldoc adjusting the paths.
Save the file and execute the commands:

$ chkconfig --add logicaldoc
$ /etc/init.d/logicaldoc start

Now you can access the program using the browser, pointing it to http://localhost:8080/. Use the account admin with password admin to enter the first time.

 /LogicalDOC

Instructions for the Trial

You can try LogicalDOC in different ways, this page lists the options you have available.

Install the application in your server

All the installation packages are available here: http://dist.logicaldoc.com
Detailed instructions for installing in different platforms are available at the following address: http://docs.logicaldoc.com/installation

License Code

Whatever is your chosen platform the installation procedure will ask you to input your license code(aka UserNo). You find it in all the messages we send you during your trial.

Access a live demo

You can access our live demo at https://demo.logicaldoc.com
Username: admin
Password: admin

Limitations

Please note that the Live Demo is not a trial of our LogicalDOC Cloud solution but it's just an installation accessible to everyone via the Internet, which allows you to get a first impression of the product without having to install it locally.
Not all the features are available, and the data are deleted and restored regularly so this installation is not suitable for performing formal test cases with your own data.

Install the application with Docker

If you have Docker installed in your server, just execute these commands in a shell:
$ docker run -d --name=mysql-ld --env="MYSQL_ROOT_PASSWORD=mypassword" --env="MYSQL_DATABASE=logicaldoc" --env="MYSQL_USER=ldoc" --env="MYSQL_PASSWORD=changeme" mysql:5.7

$ docker run -d -p 8080:8080 --env LDOC_USERNO=your_userno --link mysql-ld logicaldoc/logicaldoc
You should be able to access LogicalDOC at http://localhost:8080
Username: admin
Password: admin

Detailed instructions for using Docker are available at the following address: https://docs.logicaldoc.com/installation/install-with-docker

Guides and more informations

More Articles …