")
")
")
Conectar el buzón de correo electrónico de Google Gmail
LogicalDOC puede conectarse a Gmail de dos maneras: usando una contraseña de la aplicación de Google o mediante la autenticación OAuth 2.0. OAuth es el método recomendado y más seguro, pero requiere configuración adicional en Google Cloud. Para una configuración más sencilla, puedes usar una contraseña de la aplicación, disponible si tu cuenta de Google tiene activada la verificación en dos pasos.
Cómo conectar LogicalDOC a Gmail usando una contraseña de aplicación (App Password)
Para generar tu contraseña de aplicación puedes seguir las instrucciones de esta página.
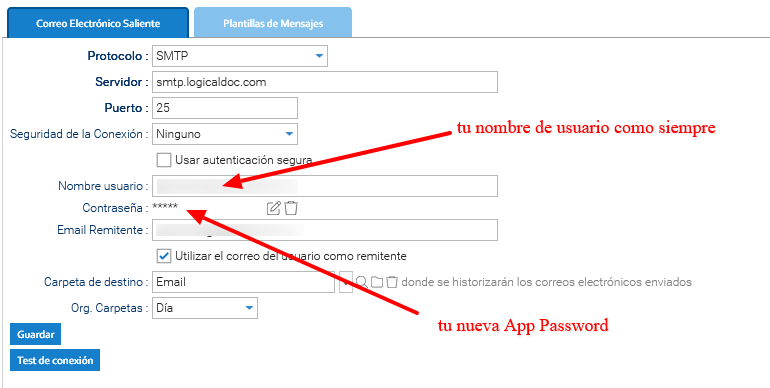
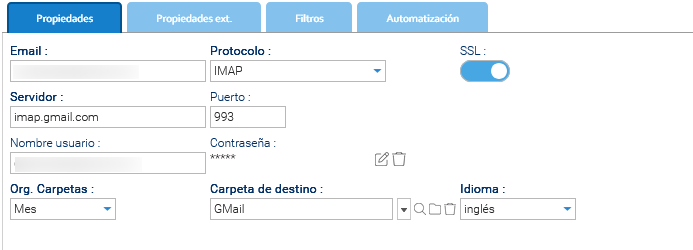
Una vez generada, inserte la contraseña de la aplicación en LogicalDOC simplemente yendo a Administración > Importar y exportar > Cuentas de Email
- Crea la nueva cuenta de correo electrónico para monitorear.
- En el campo Protocolo, escribe: IMAP o POP3.
- Habilita SSL.
- En el campo Servidor, escribe: imap.gmail.com.
- En el campo Puerto, escribe: 993.
- En el campo Nombre de usuario, escribe el mismo buzón.
- En el campo Contraseña, escribe la contraseña de la aplicación (App Password) creada.
Guarde y pruebe la conexión del buzón.
Conexión de LogicalDOC a Gmail mediante OAuth
OAuth ofrece un método de autenticación más seguro y moderno para conectar LogicalDOC a Gmail sin guardar la contraseña. Para configurarlo, sigue las instrucciones de esta página.
- Cree la nueva cuenta de correo electrónico para supervisar en Administración > Importar y exportar > Cuentas de Email.
- En el campo Protocolo, escriba: IMAP Google o POP3 Google.
- Habilite SSL.
- En el campo Servidor, escriba: imap.gmail.com.
- En el campo Puerto, escriba: 993.
- En el campo Nombre de usuario, escriba el mismo buzón.
- En el campo Contraseña, escriba la contraseña del buzón.

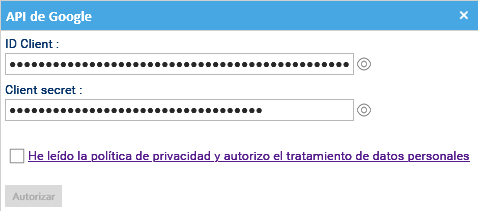
- Una vez que todo esté configurado, debes hacer clic en el enlace Autorizar para insertar el ID Client y el Client Secret.