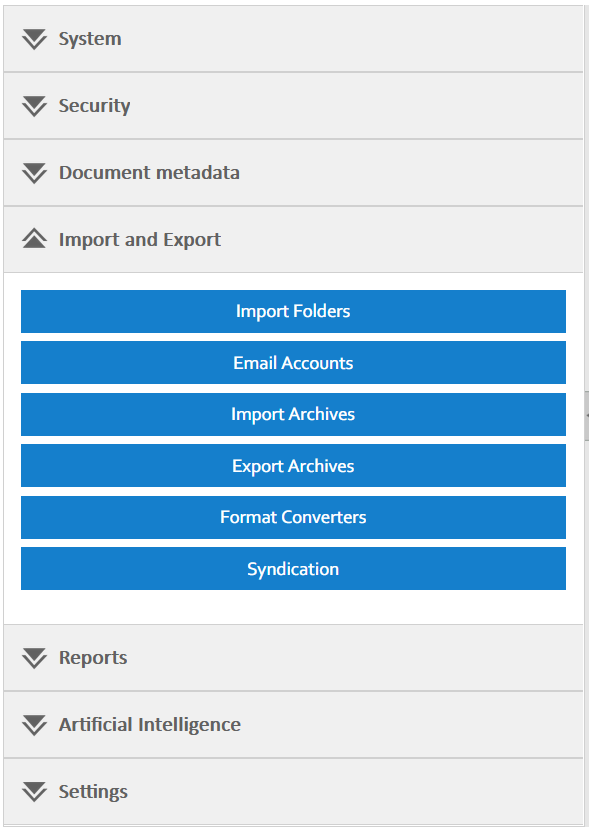
Import Folders

This feature allows you to feed LogicalDOC with files stored in a set of local and/or remote sources. A typical scenario is when you want to introduce LogicalDOC at your premises, and you already have your corporate files stored in shared folders over the network. Once configured, the Import Folder can maintain synchronized the changes that happen in the external source with the documents' repository.

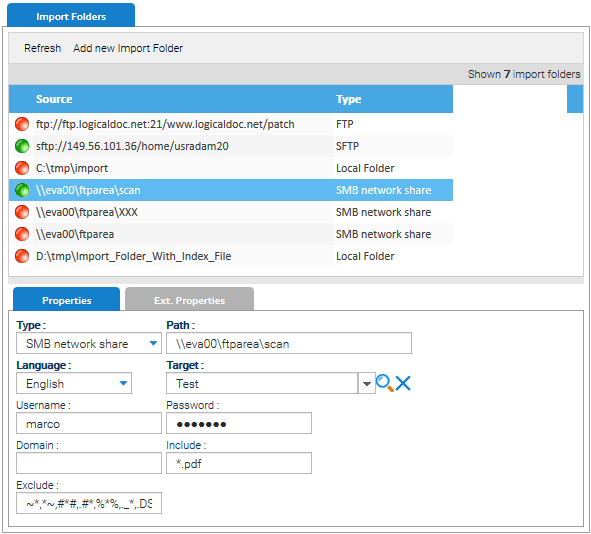
The list of Import Folders is clickable and from the context menu you can take the following actions:

  • Enable / Disable / Delete a specific folder
  • Test Connection to verify the availability of the external path
  • Reset Cache to re-import all the documents inside the selected folder

Click on Add new Import Folder to create a new folder and configure it accordingly in the Properties panel.

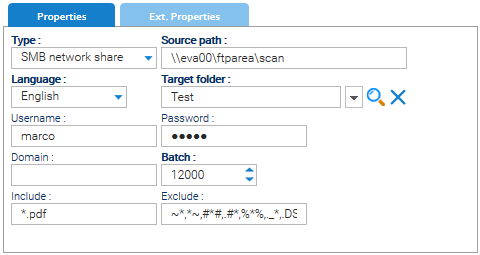
You may have import folders of different types and depending on the type you have to provide different configuration parameters. When the import folder is processed, it replicates the same tree that starts from the Path of the source location to the Target folder of LogicalDOC specified in the configuration. The Batch parameter indicates the maximum number of elements inspected at each run.

The content of the Ext. Properties tab is common to all the types.

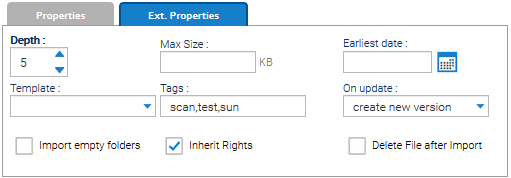
  • Depth: maximum level of depth in the navigation of the folder tree
  • Template: the template of all imported documents
  • Tags: tags applied to all imported documents
  • On update: choose if you want to import modifications done in the original files as new versions of the same documents or as new documents
  • Delete File after Import: each successfully imported file is deleted from the original location. We strongly suggest not to check this option
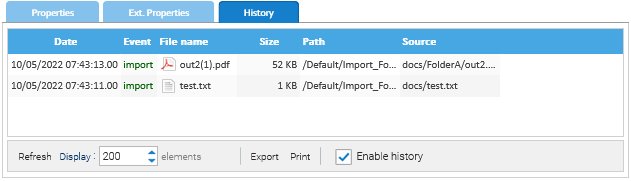
History

If you enable the history, all the events that happen during the import process are recorded and made available in the History tab.

Scheduling

What you do in the Import Folders section of the Administration is the configuration of the places where you have external data to be synchronized with LogicalDOC. The processing of the enabled import folders happens in background thanks to the task named Import Folders you can manage in Administration > System > Scheduled Tasks

Metadata

If you put a special file called index.xml in the root of the external source, LogicalDOC will process it to load the metadata(both standard and custom ones) when importing the files. The structure of the index.xml is documented in the xml schema impex.xsd. Inside the index.xml you reference the files that must be imported, and you also define all their metadata. 

In case you cannot provide such index.xml file, you could alternatively put the same information in a traditional index.csv file, where each row represents a document to import and each column a specific metadata.

You can download a complete example of Import Folder with index file.

Dictionary available for the Automation in this context

AUTOMATION CONTEXT: IMPORT FOLDERS
VariableJava ClassDescription
importFolder

ImportFolder

the import folder being processed

document

Document

the document that will be stored(automation before) or that was already stored(automation after)
pathStringthe original path of the document that will be stored(automation before) or that was already stored(automation after)
eventDocumentHistorythe import event of the document that will be stored(automation before) or that was already stored(automation after)
importsDocumentHistory

list of import events happened processing the current import folder

errorsImportFolderHistorylist of error events happened processing the current import folder

Read the Automation manual for more information.

Syndication

The Syndication is the process of feeding a remote system with contents stored in your local LogicalDOC installation.

A typical scenario is when you want to implement a Hybrid Cloud, where part of the document management system must be published to an external audience. In this context, you may configure the local system to push portions of the internal DMS to a second installation hosted outside your premises(in the LogicalDOC Cloud infrastructure or elsewhere).

Once configured, the Syndication can maintain synchronized the changes that happen locally with the remote repository.

The list of Syndications is clickable and from the context menu you can take the following actions:

  • Enable / Disable / Delete a specific syndication
  • Test Connection to verify the availability of the remote system
  • Reset Cache to delete all the information about past synchronizations

Click on Add new Syndication to create a new record and configure it accordingly in the Properties panel.

You may have syndications pointing to different remote systems and/or monitoring different local folders. When the syndication is processed, it replicates the same tree that starts from the Source folder to the Target path of the remote LogicalDOC installation.

  • Remote URL: the URL of the remote LogicalDOC installation
  • Username and Password: the credentials to use when connecting to the remote system
  • Source folder: the local folder to monitor
  • Target path: the path into the remote system that will receive the contents
  • Include and Exclude: comma separated patterns to include or exclude filenames from the synchronization process
  • Max packet size: Maximum size of a chunk sent to the remote system
  • Batch: how many documents must be pushed at each run
  • Earliest date: Documents older than this date will be skipped

Scheduling

What you do in the Syndication section of the Administration is the configuration of the different syndications. But the processing of the enabled syndications happens in background thanks to the task named Syndication you can manage in Administration > System > Scheduled Tasks

Import and Export

Inside the [Import and Export] section of the Administration, you can perform all the configurations regarding import from local and remote folder, import from email accounts, creating of archives and importing from archives. You can also find format converters and syndication function.

import-export

Connect Microsoft 365 mail server

When you connect to Microsoft 365 mail server(that is Exchange Online), it is mandatory to use the OAuth v2.0 authentication scheme via SMTP.  LogicalDOC uses the client credential flow to obtain the OAuth Token.

Register LogicalDOC as application in the Azure Portal

Open your Azure Portal, here in the Services section, open the App registrations. Click on New registration and enter LogicalDOC as the new application name.

Now that the application has been registered, please enter the API permissions to provide the following permissions:

Microsoft Graph
----------------------------------
Mail.Read
Mail.ReadBasic
Mail.ReadBasic.All
Mail.ReadWrite
Mail.Send
SMTP.Send
User.Read

Office 365 Exchange Online
----------------------------------
full_access_as_App
IMAP.AccessAsApp
Mail.Read
Mail.Send
Mail.Send.All
SMTP.SendAsApp

LogicalDOC grants

Grant admin consent

Make sure to grant admin consent for all the application permissions.

Create the service principal in Exchange Online

Once consent has been provided, the admin must register your application's service principal in Exchange using Power Shell.

Open the Power Shell and install the module ExchangeOnlineManagement with these commands:

Install-Module -Name AzureAD -SkipPublisherCheck
Import-Module AzureAD
Install-Module -Name ExchangeOnlineManagement -SkipPublisherCheck
Import-Module ExchangeOnlineManagement


Exchange Online - InstallModule

Now register the Service Principal in Exchange with these other commands:

Connect-AzureAD
Connect-ExchangeOnline
New-ServicePrincipal -AppId {Application ID} -ObjectId {Object ID}

Make sure to replace the {Application ID} and {Object ID} with those codes from Enterprise applications rather than object id of App registration.
For the same application you registered in App registration, a corresponding application has been created in Enterprise applications as well. You need to pass object id from there while registering service principal in Exchange: 


LogicalDOC Enterprise App

Obtain the principal ID with this command:

Get-ServicePrincipal | fl


Exchange Service Principal

Add full permissions to the mailbox you use to connect with this command:

Add-MailboxPermission -Identity {your email} -User {principal id} -AccessRights FullAccess


Exchange Service Principal

Enable the SMTP with this command:

Set-CASMailbox -Identity {your email} -SmtpClientAuthenticationDisabled $false


Exchange Service SMTP

Generate a client secret

In order to allow LogicalDOC to connect to your Microsoft 365 a secret must be generated, to do so open the details of your newly registered app.


App Details

Here, click the Client credentials link and generate your secret.

Save the secret

Make sure to save the secret in a secure place because it is visible only now, and you will not be able to get it anymore in the future from the Azure portal.

Configure LogicalDOC

  1. Enter in Administration > Settings > Outgoing Email
  2. In the Protocol field put: SMTP Microsoft 365
  3. Enable the option Use secure authentication
  4. In the Server field, put: smtp.office365.com
  5. In the Port field put: 587
  6. In the Username and Sender Email put the same mailbox you use to connect
  7. Disable the option Use user's email as sender
  8. In Client ID and Tenant ID put the values from the App details as you see in the Azure portal

    App Details

  9. In the Client Secret field, put the secret you previously saved

SMTP Settings

Save and test the connection.

Use user's email as sender

The settings described in this page make LogicalDOC to send all the emails as the same user that connects to your Exchange Online. If you want LogicalDOC to send the emails in the name of the other users(for instance, when a user sends a message from the interface), then enable the option Use user's email as sender. You also have to assign the Send As permission through the Power Shell as described in the Microsoft documentation.

Connect Microsoft 365 emailbox

When you connect to Microsoft 365 mail boxes, it is mandatory to use the OAuth v2.0 authentication scheme via IMAP.  LogicalDOC uses the client credential flow to obtain the OAuth Token.

Register LogicalDOC as application in the Azure Portal

Open your Azure Portal, here in the Services section, open the App registrations. Click on New registration and enter LogicalDOC as the new application name.

LogicalDOC app

Now that the application has been registered, please enter the API permissions to provide the following permissions:

Microsoft Graph
-----------------------------
Mail.Read
Mail.ReadBasic
Mail.ReadBasic.All
Mail.ReadWrite
Mail.Send
User.Read

Office 365 Exchange Online
----------------------------------
full_access_as_App
IMAP.AccessAsApp
Mail.Read
Mail.Send

LogicalDOC grants

Grant admin consent

Make sure to grant admin consent for all the application permissions.

Create the service principal in Exchange Online

Once consent has been provided, the admin must register your application's service principal in Exchange using Power Shell.

Open the Power Shell and install the module ExchangeOnlineManagement with these commands:

Install-Module -Name AzureAD -SkipPublisherCheck
Import-Module AzureAD
Install-Module -Name ExchangeOnlineManagement -SkipPublisherCheck
Import-Module ExchangeOnlineManagement


Exchange Online - InstallModule

Now register the Service Principal in Exchange with these other commands:

Connect-AzureAD
Connect-ExchangeOnline
New-ServicePrincipal -AppId {Application ID} -ObjectId {Object ID}

Make sure to replace the {Application ID} and {Object ID} with those codes from Enterprise applications rather than object id of App registration.
For the same application you registered in App registration, a corresponding application has been created in Enterprise applications as well. You need to pass object id from there while registering service principal in Exchange: 


LogicalDOC Enterprise App

Obtain the principal ID with this command:

Get-ServicePrincipal | fl


Exchange Service Principal

Add full permissions to the mailbox with this command:

Add-MailboxPermission -Identity {your email} -User {principal id} -AccessRights FullAccess


Exchange Service Principal

Generate a client secret

In order to allow LogicalDOC to connect to your Microsoft 365 a secret must be generated, to do so open the details of your newly registered app.


App Details

Here, click the Client credentials link and generate your secret.

Save the secret

Make sure to save the secret in a secure place because it is visible only now, and you will not be able to get it anymore in the future from the Azure portal.

Configure LogicalDOC

  1. Create the new email account to monitor in Administration > Import and Export > Email Accounts
  2. In the Protocol field put: IMAP Microsoft 365
  3. Enable the SSL
  4. In the Server field, put: outlook.office365.com
  5. In the Port field put: 993
  6. In the Username field, put the same mailbox
  7. In Client ID and Tenant ID put the values from the App details as you see in the Azure portal

    App Details

  8. In the Client Secret field, put the secret you previously saved

Email Settings

Save and test the mailbox connection.