
Move

From the documents list grid, select the documents you want to move and then select the [Cut] item of the context menu. This will put the current selection into the clipboard.

cut document

Now, in the folders tree, right-click on the destination folder and select the [Paste] item. As you can see, the documents were moved to the target location. Note that they are no more present in the source folder.

move document

Delete

From the documents list grid select the documents you want to delete and then select the [Delete] item of the context menu. Than you have to confirm the operation.

delete
 

After that the document will be deleted and they will appear in your personal trash.

Copying, Moving and Deleting documents

Copying and moving documents requires having at least Read right on the original document and Write right in the target folder. Copying and moving are done using the clipboard, which is located in the status bar.

Copy

In the documents list select the elements you want to copy then right-click on them and choose the Copy item of the context menu. This will put the current selection into the clipboard.

Now, in the folders tree, right-click on the destination folder and select the Paste item. As you can see, the documents were copied in the target location. Note that they are completely new documents, not connected with the original ones.

Move

In the documents list select the elements you want to move then right-click on them and choose the Cut item of the context menu. This will put the current selection into the clipboard.

Now, in the folders tree, right-click on the destination folder and select the Paste item. As you can see, the documents were moved to the target location.

Delete

You must have the Delete permission to be able to delete documents. In the documents list select the elements you want to delete then right-click on them and choose the Delete item of the context menu.

Once deleted, the documents are no longer in the current folder, but you can find them in your trash bin located on the left side of the screen.

If you want to restore a deleted element, just right-click on it and select Restore. The element is restored in the currently selected folder.

Editing the metadata of a document

Metadata is the basis of any modern record management system. LogicalDOC allows you to store the standard and custom metadata of your documents. To be able to edit the metadata, you will need the Write permission.

Standard properties

In the document's grid, select a document. The properties panel will appear below, showing the standard properties.

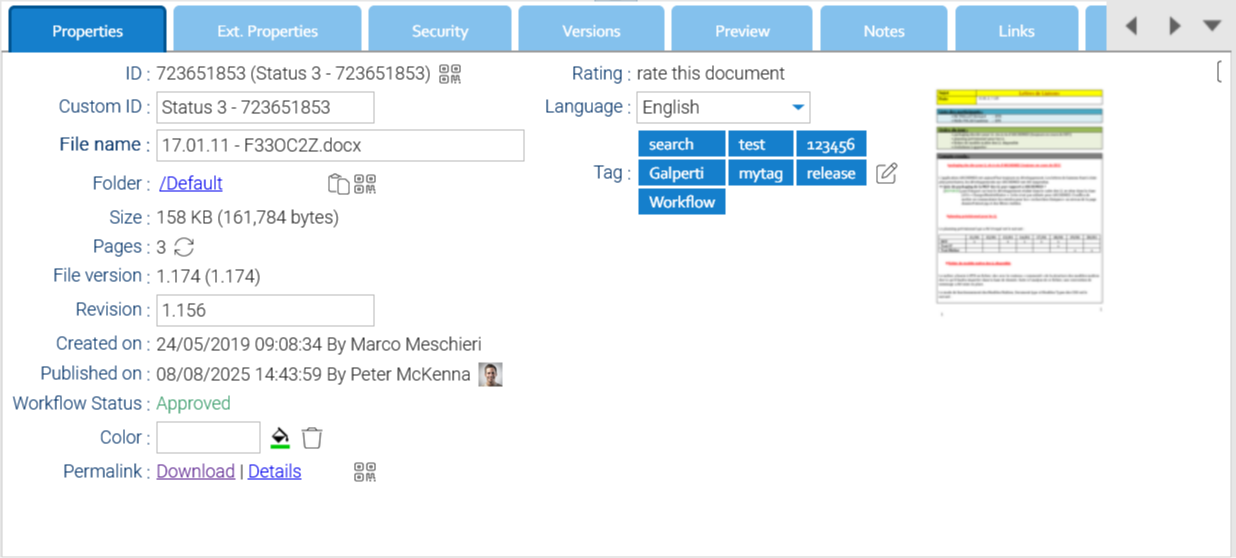
Here, you can see and edit a set of properties:

  • File name: every document has a file name
  • Custom ID: optional field you can use to provide your unique identifier
  • Revision: optional field you can use to provide your own version
  • Language: indicates the language in which the document is written, which is necessary for the indexing algorithm
  • Tag: you can apply tags to find the document quickly in the future. You can select tags that are available in the system. Depending on the configuration, you may also see a New tag icon that allows you to create new tags
  • Vote: you can register a vote on the document. A user can only vote once on the same document.

Please note that the document's ID, which is a unique identifier of the document within the database, is automatically handled by LogicalDOC and cannot be altered.

Extended properties

In the Extended properties section, there are additional properties that are associated with the document.


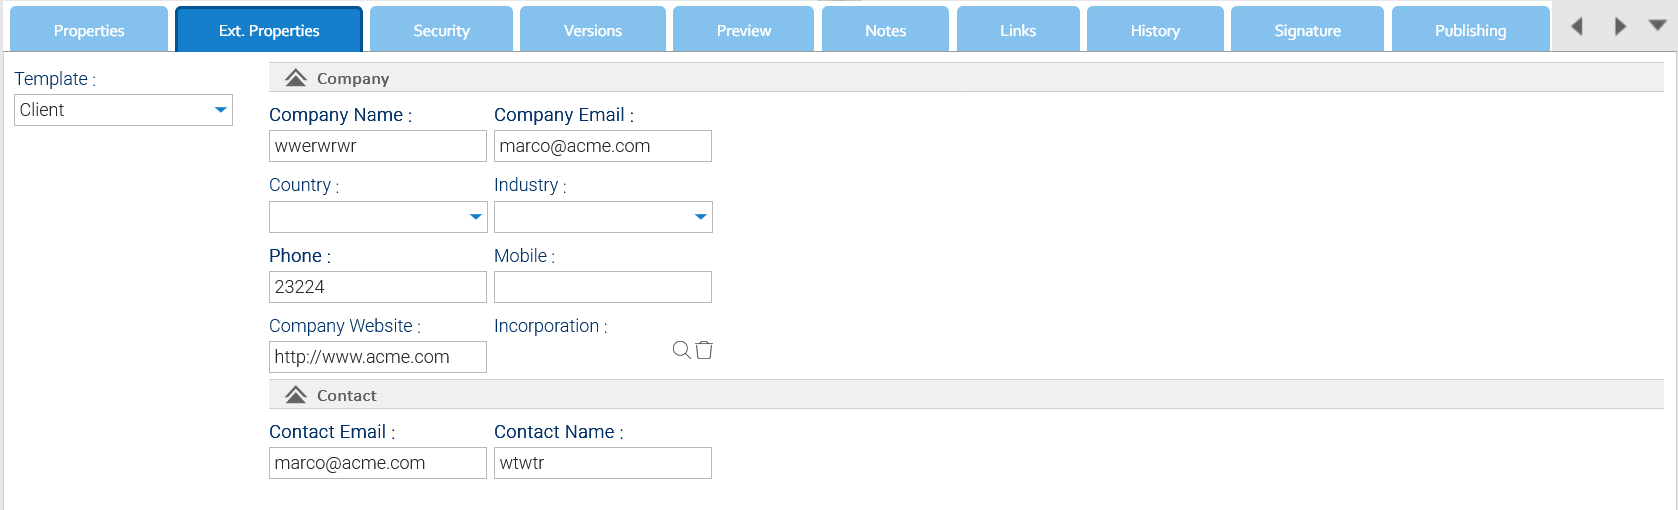
You have the option to apply a Template from a list of configured templates. If you assign a template, a set of custom attributes will appear. The number, names and types of these attributes are defined in the template's configuration.

Saving the modifications

Each time you make a change, a Save button is displayed. You must click on it to confirm all the changes.  It will result in a new minor version being saved with your modifications.


Bulk update

Sometimes you have to edit a set of documents with the same metadata, that is exactly what the Bulk update feature is designed for. Just select some documents and click the Bulk Update icon in the toolbar.

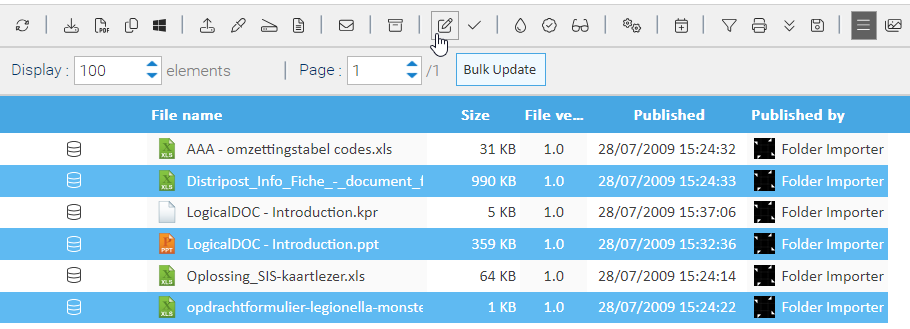
A dedicated wizard will start, and you can define both standard and extended properties that will be applied to the current selection. Remember that all the metadata you fill in this wizard will replace the current value in each one of the selected documents. Check the option Ignore empty fields to skip those fields you leave blank.

Editing the content of a document

LogicalDOC handles the modifications of content through check-out/check-in cycles.  However, these changes are only possible if you have the Write permission in the folder where the document is stored. The check-out operation locks the document so that other users cannot alter it while you are editing it. When you are finished with the editing, you will confirm your modifications by checking-in the new content. The check-in will also unlock the document so that other users will be able to edit it. Each time that you check in content, a new version is automatically created. All the past versions of the document are accessible in the Versions tab and available for download, preview and comparison.

A number of possible ways of editing the document's content are presented below.

Standard Check-out

Right-click on the document you want to edit and select the item Checkout

The document is now checked-out and the proper icon appears indicating its status. Once checked-out, you are the only person who can alter the document. The other users can only access it in read-only mode. This mode allows you to download the file to your PC and to edit it locally. Once you have made all the required modifications, right-click again on the document and select Checkin.

A dialog box will now appear to guide you in uploading a new file. Use the option 'Major Version' to mark this update as a major version (this will increase the version number, e.g., 1.0 -> 2.0).

Bulk Checkout

You can edit more documents simultaneously and automate the check-out/check-in operations by selecting the desired documents and then clicking on the Bulk Checkout toolbar icon.

Webstart

The bulk checkout function is implemented as a Java Application and if your PC runs Windows, you have to install the LogicalDOC Webstart launcher

Now, depending on the configuration of your system you could be required to download a .jar file and execute it(it would be sufficient to double-click on it in case Java has been associated with that extension) or this process could be automated by the LogicalDOC Webstart launcher.

At the end, the app is launched, and you can see its window.

All the documents will be checked-out, and a popup window will show you the list of the files that you are currently editing. To modify one of the files, just double-click on it. The file will be opened in your local editor.  This allows you to edit one or more files multiple times. LogicalDOC will automatically detect if an element was modified locally.

Activate sid in request

To successfully display the popup window, you need to activate the "Allow sid in request" parameter inside Administration > Security > Security

bulk checkout
 

To confirm the modifications in a particular document, right-click on it in the Bulk Checkout window and select Checkin. To finish this editing session, you should close the Bulk Checkout window. This will unlock all the selected documents.

More options

You can also edit your documents with: