
Two Factors Authentication (2FA)

Two-factor authentication is now recommended to secure login to Internet services and protect against phishing attacks and credential theft. This authentication generates two-step verification codes for the users on their devices, thereby increases the security of your account by requiring a second verification step at the time of access. 

Two-factor authentication makes it difficult for hackers to access online accounts and a person’s devices because of its advanced security level. It isn’t sufficient to recognize the victim's password to pass authentication verification. To prevent the data of their users’ from hackers, online services are progressively introducing 2FA. Two-factor authentication is responsible for accessing and controlling the sensitive data and systems.

LogicalDOC supports the two-factor authentication integrating the most commonly uses 2FA technologies like Goole Authenticator, Yubikey or Duo.

Once the two-factor authentication is enabled, after filling the credentials a second login panel may appear asking to input the second factor key:

1   2


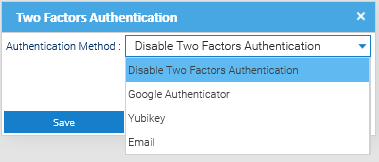
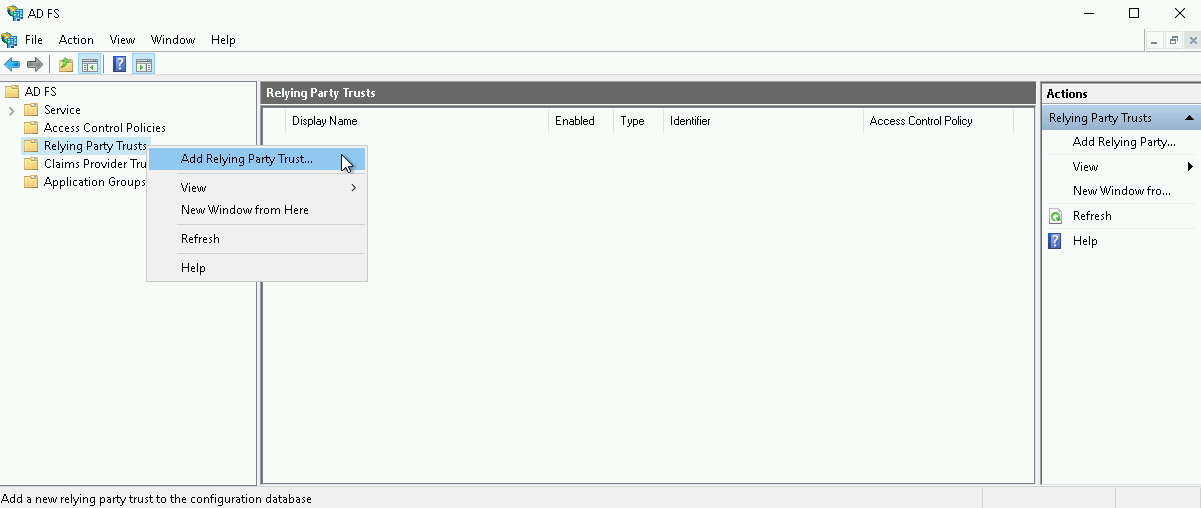
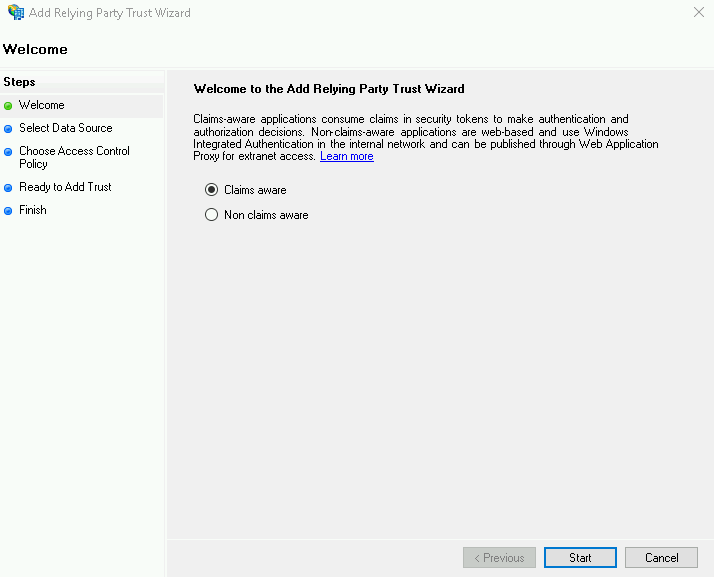
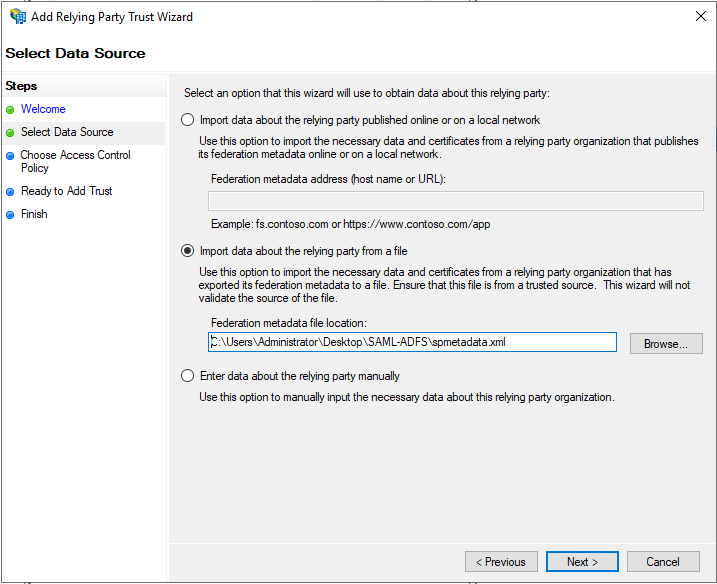
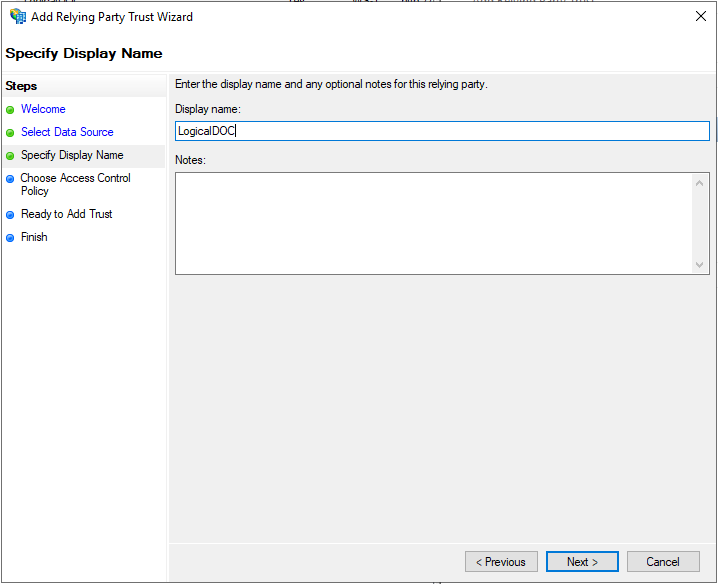
Enable this feature in Administration > Security > Two Factors Authentication, and also enable the authenticators you want to support.

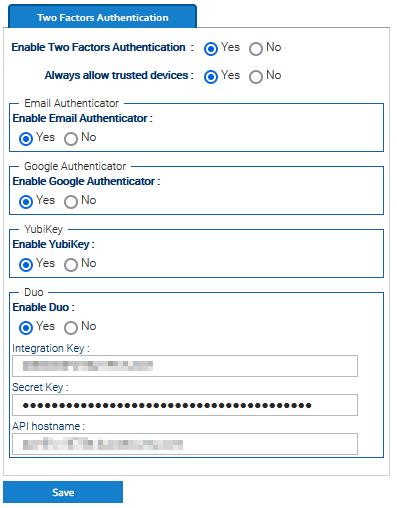
Once this has been done, each user can enable the 2FA by using the menu Account > Security > Two Factors Authentication.

In any case, the administrator can force the 2FA on specific users. To do so, enter Administration > Security > Users and right-click on a user, then choose Two Factors Authentication.

In the popup, choose an authenticator and follow the indications. Please note that in general, the authenticators require the physical presence of the authentication device.

Two Factor Authentication with Duo

If you choose Duo as your two factor authentication, you have to configure the connection to the Duo API. A detailed guide from Duo is available here: https://duo.com/docs/protecting-applications

First of all enter the Duo administration panel, go to Applications  and click on Protect an Application

Duo admin panel

In the next page select Duo Auth API:

Duo protect and application
 

Now you get the settings you must copy and paste in the Duo configuration panel in the LogicalDOC's administration:

API security

You can also give a name to the application in Duo, we suggest to use LogicalDOC:

API settings

At the end click on Save to confirm everything.

Configure SAML with Microsoft ADFS

Before you begin

Before you begin, you need to generate encryption certificates for encrypting the SAML connection and load them in LogicalDOC

  1. You can use the Bash script from the logicaldoc/scripts repository on GitHub, or any other suitable method.
  2. Save the two files that are generated. They are the private key and the public key. In the SAML settings panel, they are referred to as the SP Private Key and the SP Certificate, respectively.

You also have to make sure to use LogicalDOC over HTTPS because ADFS will not accept a plain HTTP Relying Party.

Prepare LogicalDOC

  1. Enable the SAML Single Sign-On in Administration > Security > SAML Single Sign-On
  2. In the SP Entity ID field put a unique identifier (you may put here the same URL you normally use to connect to LogicalDOC, e.g. https://localhost:8443)
  3. Enable both the signature of the AuthnRequest messages and the encryption of received assertions.
  4. Choose SHA-256 as Signature algorithm.
  5. Upload the SP Certificate and SP Private Key generated before, in the correspondent fields.
  6. In the Attribute mappings form, prepare the following mappings:
    • In Username, type username
    • In First Name, type firstName
    • In Last Name, type lastName
    • In Email, type email
    • In Groups, type groups

    Click on Save to confirm all the configuration.

    SAML Panel
  7. Export the Service Provider metadata file by clicking on the URL displayed in the SP Metadata field. You will then use this file in ADFS later.

Now you completed the LogicalDOC's configuration and can approach the setup of ADFS.

Prerequisites

  • An Active Directory instance where all users have specified email and username attributes.
  • A running Microsoft Server.
  • An SSL certificate to sign your ADFS login page.
  • ADFS installed on your Microsoft Server. You can find a detailed guide for deploying and configuring ADFS in this article.

On your ADFS installation, open the ADFS console. Select Service, then select Endpoints. In the Type column, search for SAML 2.0/WS-Federation and note down the value of URL Path column. This is also known as the SAML SSO URL Endpoint in this guide. If you chose the defaults for the installation, this will be /adfs/ls

Add a relying party trust

  1. Open the ADFS management snap-in, then select AD FS > Relying Party Trusts > Add Relying Party Trust from the right sidebar. You can also right-click Relying Party Trusts, then select Add Relying Party Trust from the context menu.

    Relaying party
  2. On the Welcome screen of the configuration wizard, select Claims aware, then select Start.

    Relaying party
  3. On the Select Data Source screen, select Import data about the relying party from a file. Choose here the same metadata file obtained in the step 7 of LogicalDOC's preparation.

    Relaying party
  4. On the Specify Display Name screen, enter a Display Name (e.g., LogicalDOC). You can add optional notes.

    Relaying party
  5. On the Choose Access Control Policy screen, select the access control policy suitable for your environment. This guide assumes the default values Permit everyone.

    Relaying party
  6. On the Ready to Add Trust screen, review your settings.

    Relaying party
  7. On the Finish screen, select Configure claims issuance policy for this application, then select Close.

    Relaying party

Create claim rules

  1. In the Issuance Transform Rules tab of the Claim Rules editor, select Add Rule….

    Claim rules
  2. On the Choose Rule Type screen, select Send LDAP Attributes as Claims from the drop-down menu, then select Next.

    Claim rules
  3. On the Configure Claim Rule screen, enter a Claim Rule Name of your choice (eg: logicaldoc), select Active Directory as the Attribute Store, then add the following mapping:

    • From the LDAP Attribute column, select E-Mail-Addresses. From the Outgoing Claim Type, type email
    • From the LDAP Attribute column, select Given-Name. From the Outgoing Claim Type, type firstName
    • From the LDAP Attribute column, select Surname. From the Outgoing Claim Type, type lastName
    • From the LDAP Attribute column, select SAM-Account-Name. From the Outgoing Claim Type, type username
    • From the LDAP Attribute column, select Token-Groups - Unqualified Names. From the Outgoing Claim Type, type groups

    Select Finish to add the rule.

    The entries in the Outgoing Claim Type column can be modified. The entries may contain dashes but no spaces. They are used to map the corresponding fields in LogicalDOC.

    Claim rules
  4. Select Add Rule to create another new rule.

  5. On the Choose Rule Type screen, select Transform an Incoming Claim from the drop-down menu, then select Next.

    Claim rules
  6. On the Configure Claim Rule screen, enter a Claim Rule Name of your choice, then:

    • Select UPN for the Incoming claim type
    • Select Name ID for the Outgoing claim type
    • Select Email for the Outgoing name ID format

    Select Pass through all claim values, then select Finish.

    Claim rules
  7. Select Finish to create the claim rule, then select OK to finish creating rules.

  8. Open Windows PowerShell as an administrator, then run the following command:

    Set-ADFSRelyingPartyTrust -TargetName LogicalDOC -SamlResponseSignature "MessageAndAssertion"

    where LogicalDOC is the name you specified in step 4 when you added a relying on party trust.

    This action adds the signature to SAML messages, making verification successful.

Export identity provider metadata

Next, export the identity provider metadata, which will be later uploaded to LogicalDOC to finish SAML configuration.

  1. In the left navigation pane, expand AD FS > Service, and then click Endpoints.

  2. In the right pane, under Endpoints > Metadata, in the Federation Metadata row, copy the URL path.

    For example, copy FederationMetadata/2007-06/FederationMetadata.xml

    Claim rules
  3. Add the host name of the AD FS computer to the URL path you copied as follows:

    https://hostname/FederationMetadata/2007-06/FederationMetadata.xml

  4. To retrieve the IdP (identity provider) metadata, in a browser, paste the complete URL.

  5. Go to LogicalDOC in Administration > Security > SAML Single Sign-On and upload the Identity Provider Metadata file into the field IdP metadata.

    Click on Save button to confirm all.

Test the login

In order to test if all was correctly configured, you may try to initiate a login from LogicalDOC acting as the Service Provider.

  1. Go to LogicalDOC in Administration > Security > SAML Single Sign-On and copy the link of the Login field (it is the base URL of LogicalDOC followed by /saml/login).
  2. Open a different browser and paste the URL, and you should be redirected to the ADFS login page.
  3. Here, enter the credentials of a user in your Active Directory and you should be logged directly into LogicalDOC.

External Authentication

The application is able to handle users authentication interacting with external systems in addition to the standard authentication. We can authenticate your users against ActiveDirectory and LDAP systems.

Please enter the section Administration > Security > External Authentication

Here, you can configure the connection to a set of LDAP and/or AD servers:

  • URL: complete connection URL to the external authentication server including port number (for ActiveDirectory it is 389)
  • Username: username of a user that can perform searches inside your LDAP/ActiveDirectory (for ActiveDirectory you have to put the canonical name of the user)
  • Password: password to connect
  • Users base node: canonical name of the root node where the users are located (you can define more nodes separated by semicolon ';')
  • Groups base node: canonical name of the root node where the groups are located (you can define more nodes separated by semicolon ';')
  • User Inclusion / Exclusion filters: comma separated lists of expressions to restrict the usernames to allow, eg: inclusion: usr*,user*    exclusion: sysem*,Administrator,Sysadmin
  • Group Inclusion / Exclusion filters: comma separated lists of expressions to restrict the group names to allow, eg: inclusion: grp*,group*,staff    exclusion: Admin*,Power*
  • Timeout: max time to wait an answer from the authentication server
  • Synchronize if older than: number of hours after which the profile of local user is updated with the current data from the directory (0 means always synchronize, -1 means never synchronize)
  • Keep membership in local groups: If enabled, the memberships you define in LogicalDOC will be retained otherwise they will be overwritten by those specified in the LDAP or AD server
  • Validation: an automation procedure invoked any time a user is about to be authenticated through the LDAP to decide if it must be authenticated or not, or to perform further elaborations on the user itself. The automation procedure will receive the variable ldapUser, use the boolean flag ldapUser.valid to mark the user as authorized or not.

Dictionary available for the Automation in this context

AUTOMATION CONTEXT: EXTERNAL AUTHENTICATION
VariableJava ClassDescription
ldapUser

LDAPUser

the user being authenticated

Read the Automation manual for more information.

To check if the connection parameters are correct, just click on Test Connection.

Once you have connected the external directory, click on Save to make persistent your changes.

 On the fly authentication

The next time a user tries to log into LogicalDOC, he will be authenticated against your LDAP/ActiveDirectory first and if the process completes successfully, the user's profile(but not the password) is also automatically imported in LogicalDOC.

Manually import users

From time to time you may want to manually import a new user from the LDAP/ActiveDirectory, in this case open the Browser tab and here below click on Search to find all the users located at any level below the configured base node.

Right-click on the user you want to import and select Import. When the user is imported, the groups he belongs to (and that fall below the groups base node you configured before) are imported as well. 

 Security policies

When the user is imported the first time, you will have to grant him and/or his groups the permissions in LogicalDOC. By default, the imported user has the same permissions granted to the guest group.

Security implications

LogicalDOC needs to retrieve the profile information of the user from LDAP (email, phone etc.) so it requires the serialization. Please use trusted LDAP servers only, and in any case to connect to it with read-only permission credentials

Active Directory

Click on Active Directory to launch a small wizard that applies some standard parameters suitable for connecting to an AD domain server.

Single Sign-on

The Central Authentication Service (CAS) is the most used single sign-on protocol for the web. Its purpose is to permit a user to access multiple applications while providing their credentials (such as userid and password) only once. It also allows web applications to authenticate users without gaining access to a user's security credentials, such as a password. The name CAS also refers to a software package that implements this protocol.

First, you should read about how CAS works: A detailed walk through a CAS authentication

According to the CAS documentation, it only works in secured HTTPS connections. For this reason, you need to use LogicalDOC over HTTPS. Access https://localhost:8443 to check it works fine.

If you do not have a CAS server already installed for your company, we suggest to download and install this implementation: https://www.apereo.org/projects/cas

To configure the Single Sign-on in LogicalDOC enter the section Administration > Security > Single Sign-on

In the following form, you have to enable the feature and connect LogicalDOC to your CAS service:

  • Application Url: the URL to be used by the CAS server to reach LogicalDOC
  • CAS Url: the URL to be used by LogicalDOC server to reach the CAS server
  • CAS login Url: the URL of the login form hosted by the CAS server
  • Group: group assigned to new users authenticated throught the CAS
  • Language: language assigned to new users authenticated throught the CAS

Once the Single Sign-on is activated, you should access LogicalDOC at this url: https://localhost:8443/frontend

If you are not already authenticated, you will be routed to the login page of the CAS server.

Info

Even if you enable the Single Sign-on, the standard login page at https://localhost:8443/login continues to be available and works as usual.