
Open a Document

Click on the  [Open] button to show the documents browser that let you to browse the folders tree. Each time you open a folder the list of all contained documents is presented for selection.

A search box is also available on the top to help you in finding the right document.

Select the desired document then press [Open] to open it in your application.

Save a Document

In order to save the actual document into LogicalDOC, you have to click the [Save] or [Save As] button. A dialog box will appear allowing you to choose the target folder and define the document name.

In case the current document was previously opened from LogicalDOC, a new version is automatically created in the document management system.

Press [Save] to store the document.

Webstart

A set of features in LogicalDOC require the execution of a small Java application in the client PC. This application is a simple java archive .jar that must be downloaded in your Windows PC and executed through the Java runtime (usually a double click on the file is enough).

In order to simplify this download & run phase, we provide a simple utility called LogicalDOC Webstart available here: https://www.logicaldoc.com/download/client-tools/webstart

Pre-requisites

You need Microsoft Windows and Java runtime

Recommendation

If you are running Windows, we strongly recommend installing this tool. It is also mandatory to have it in case you are using Chrome because that browser does not allow the direct download of .jar files.

Enable Webstart

The system administrator must also enable the webstart in Administration > Settings > GUI Settings > Webstart mode

Kofax Bridge

Kofax Express is an easy-to-use, batch-oriented document scan application for Windows capable of high-speed scanning with real-time Zonal OCR and indexing. You can find more informations here: http://www.kofax.com/document-scanning-software

The Kofax Bridge is an integration tool provided by LogicalDOC that processes the output of Kofax Express and imports your scans as well as the extracted fields into the central repository. The combination of Kofax Express and Kofax Bridge adds to LogicalDOC good Zonal OCR capabilities.

Install and Configure Kofax Express

After the installation of the Kofax Express application, you have to create one or more scan Jobs configured in a way that could be correctly processed by Kofax Bridge.

>>Please read this guide that explains how to setup a simple Job to process invoices<<

Install and Configure Kofax Bridge

Get the installation file from the download website. To install LogicalDOC Kofax Bridge unpack the zip archive then open a terminal window and execute the command from command line:

$ java -jar logicaldoc-kofax-installer.jar

During the setup you will be required to put the connection parameters to your LogicalDOC installation.

On Windows, after the installation you will have a new Windows service and in the status bar a new icon will appear.

In order to configure the import batches, please right click on the LogicalDOC Kofax icon and choose Settings. A console will appear and will alow you to configure the different batches to monitor.

For each  batch you have to specify:

  • The local path where Kofax Express exports the output of this batch
  • A taget folder in LogicalDOC that will receive your scans
  • The template that defines the the same fields extracted by Kofax Express

It is important to note that each batch is associated to a template and that the names of the attributes of this template must match the fields configured in Kofax Express, in this way the extracted informations will be stored in the documents' extended attributes.

At this point the Bridge is completely configured and running, so you can work with the Kofax Express application and from time to time the Kofax Bridge will import in LogicalDOC your scans with the metadata extracted and stored as extended attributes.

Configure Kofax Express

In this guide we will configure in Kofax Express a Job to process scans that are invoice, in this simple scenario we will extract just 3 fields: InvoiceNo, Date, Customer

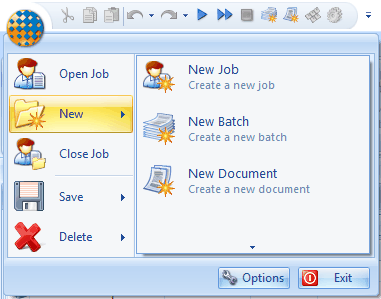
1 - Create a new Job

In the main menu click on New Job

Now pen the Job Setup tab, where you have to apply some configurations.

In the section Destination make sure that the selected Job is Scan Invoices.

In the section Export uncheck the option Delete batch after export and change the Connector to Multipage.

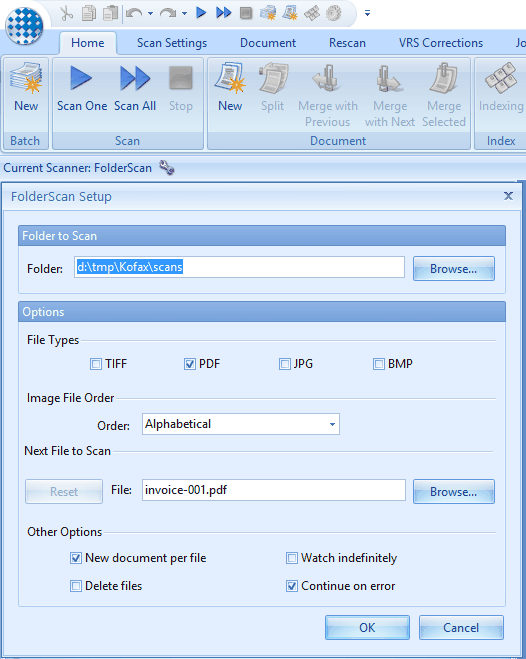
In the section Associated Scan Profile choose FolderScan.

In the toolbar you see now that the Current Scanner is FolderScan, please click in the configuration icon and put the path that will contain the scans, please save this path for future reference.

2 - Configure the Export Format

In the Job Setup tab, click on the icon to configure the Multipage connector.


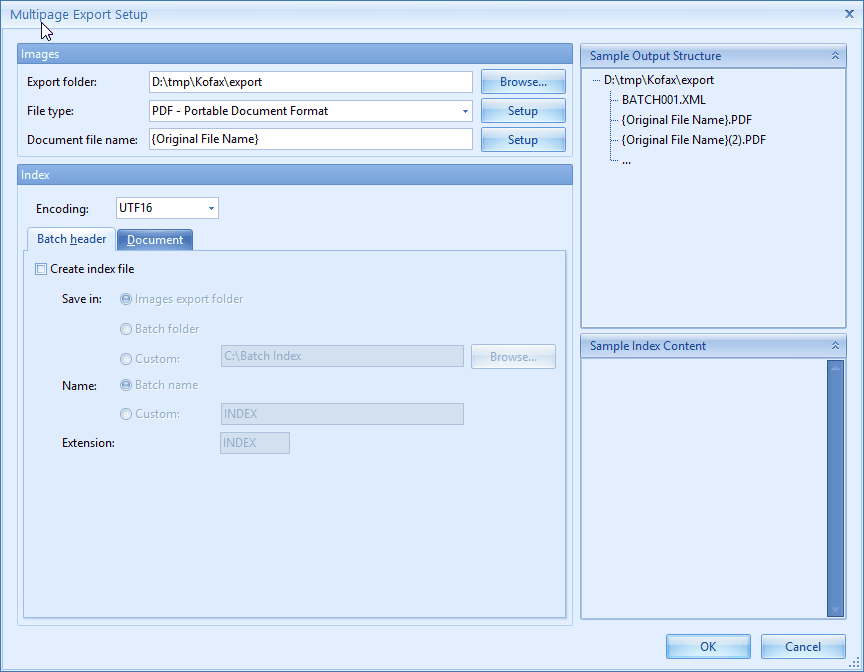
Here apply the following settings:

Export Folder: put a path that will receive the ouput of the processing, please save this path for future reference.

File type: select PDF

Document file name: put {Original File Name}

You can deselect the Create index file option

Now open the Document tab

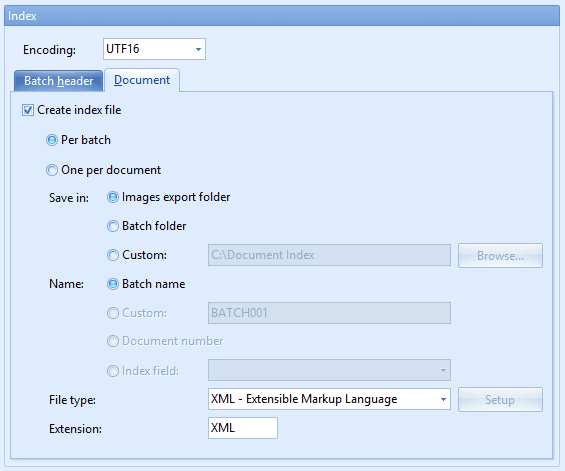
Here check the Create index file option and choose Per batch.

In Save in choose Images export folder

In Name leave Batch name

In File type choose: XML

3 - Define the fields

We will define now 3 fields that will be extracted from the invoices: InvoiceNo, Date, Customer. Open the Index Setup Tab and here click in New button in the Index Fields section.

Give the name InvoiceNo to the new field, select Single line as Type, in Zonal Recognition select Template Mode. In the same way create the Customer field.

Now we will create the Date field with a validation.

In the validation put the following recognition pattern: DD"/"MM"/"YYYY

Use same name for fields and extended attibutes

The extracted informations will be stored in extended attributes of a Template configured in LogicalDOC. For this reason you must have a perfect match between the name of the fileds configured in Kofax Express and the name of the extended attributes configured in the Template in LogicalDOC.

4 - Create a new Batch

Open the the Home tab of the ribbon bar and click on the New button in the Batch section, this will create a new batch and a new row will appears in the Batches window.

Now put your scans in the folder you configured in Step 1 and then click on Scan All button in the Scan section.

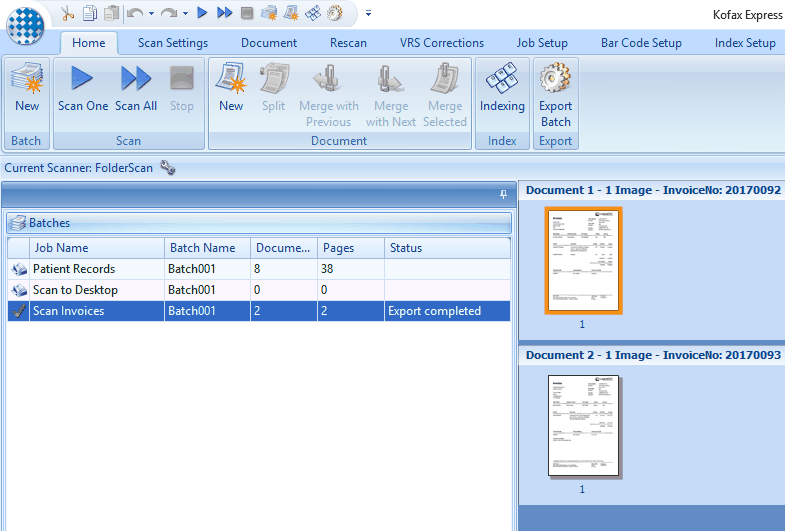
Now the program processes the scans folder and at the end in the right panel you will see all the documents loaded in the batch, in this case they are invoices.

5 - Define the Zones

After your scans are loaded, you have to define the recognition zones, to do so open the Home tab and click on the Indexing button. In the next panel you see a preview of the first scan so press the Draw Zone button an draw the zone for each one of the fields.

When you have defined the zones click on the Next document arrow button and do the same fo all the following documents.

6 - Export the Batch

Click again the Indexing button to return to the batches visualization, in the batches list right click on the current batch and choose Start Export.

Kofax Express extracts all the fields and will produce it's output in the path you confiured in Step 2. It is the same folder that will be monitored by the LogicalDOC Kofax Bridge.