")
")
")

Each workflow is composed by several tasks connected by transitions. In the designer each task is drawn as a box with specific icon and color, and you can move them simply by dragging the object where you want in the drawing panel. To edit the properties of a specific element just double-click on it to open the context menu.
Here below you can see all the different types of tasks you can use.
TASK
A task represents a specific activity that can be accomplished by a number of participants.
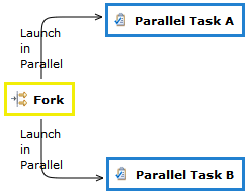
FORK
JOIN
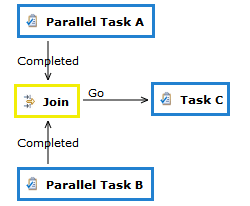
When you need to wait for various parallel activities to complete before moving on, it is necessary to insert a Join element.
Click on Add Join and it appears the join object into the workflow schema design page. You can connect all the parallel activities to this node by using standard tranditions, and the system will guarantee the completion of all these before passing control to the next task.
Of course with a Join you can have more ingoing transitions but only one outgoing, that is automatically triggered when all the parallel activities are completed.
END STATUS

The End Status is the primitive you have to use to model the end of the business process. When the workflow reaches this status, the execution ends. An End Status can accept ingoing transactions only.